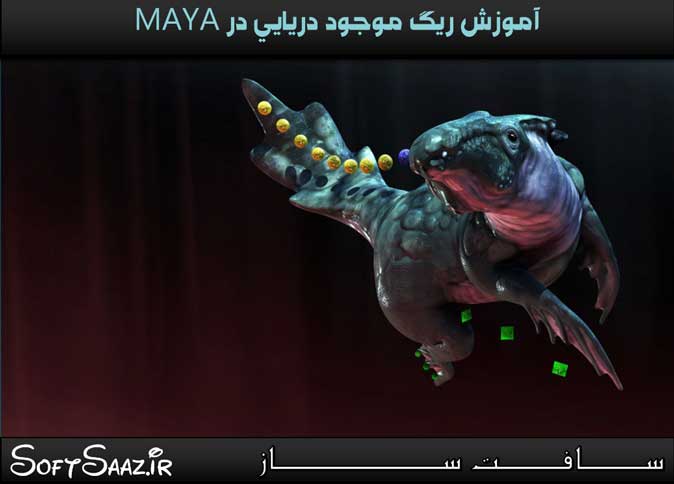
آموزش ریگ کردن موجود دریایی در مایا Maya
Rigging Sea Creatures in Maya
آموزش ریگ کردن موجود
در این آموزش ” آموزش ریگ کردن موجود ” از شرکت Digital Tutors مربی دوره Delano Athias ، نحوه ی ریگ کردن یک موجود دریایی را در نرم افزار مایا به شما آموزش می دهد. ما ابتدا نحوه ی پیکربندی اسکریپتهای MEL برای استفاده در کارهای تکراری را به شما آموزش می دهیم.
شما نحوه ی ساخت یک ریگ بسیار حرفه ای را فرا می گیرید.ما همچنین از تکنیکهای اسکین کردن برای کاهش زمان و شبیه سازی وزن استفاده می کنیم.پس از گذراندن این آموزش شما تمامی دانش های لازم برای ساخت ریگهای حرفه ای را فرا گرفته اید و میتوانید بر روی کاراکتر های مختلفی آنها را پیاده سازی کنید..با سافت ساز همراه باشید .
عناوین دوره آموزش ریگ کردن موجود :
- طراحی کنترل ریگ
- ساخت منحنی برای ستون فقرات
- ایجاد منحنی برای استخوان قفسه سینه و لگن
- ایجاد استخوان برای ستون پشتی
- تغییر فرم شکل گردن و سر
- سیستم Spline IK برای ستون فقرات
- کنترل انیمیشن مهره ها
- کنترل گردن و سر
- ایجاد کنترل ها FK برای دم
- اتصال زنجیره ایی دم به منحنی داینمامیک
- ریگ نهایی موجود
- آموزش ریگ کردن موجود
- و ….
پیشنمایش دوره آموزش ریگ کردن موجود :
عنوان دوره : Digital Tutors – Rigging Sea Creatures in Maya
سطح : متوسط
زمان کل دوره : 5 ساعت
تعداد فایل های تصویری : 48
سال آموزش : 2011
فایل تمرینی : دارد
مربی دوره : Delano Athias
نرم افزار : Autodesk Maya 2012
زیرنویس : ندارد
Digital Tutors – Rigging Sea Creatures in Maya
In this tutorial we will learn how to rig a sea creature in Maya. Throughout the tutorial we’ll focus on setting our creature up with creative and intuitive controls. We’ll learn how to set up Mel scripts to cut down time on repetitive tasks. We’ll learn how to create a proficient vertebrae rig. We’ll create an automated overlapping tail system that can be blended into an FK control rig. We’ll also explore skinning techniques to reduce the time it takes to edit weights. By the end of this Maya tutorial, you’ll have the knowledge you need to create your own aquatic creature rigs, with techniques that can be used on a wide variety of creatures and characters. Software required: Autodesk Maya 2012.
01. Introduction and project overview
02. A discussion on the design of the control rig
03. Prepping the scene
04. Adding tools and scripts to our shelf
05. Building curves for the vertebrae and tail
06. Creating curves for ribcage and hip bones
07. Building bones for the dorsal column
08. Extra joints for the ribcage and hip
09. The tail bones
10. Adding the head bone
11. Clusters for the creature’s front fin
12. Creating joints along the front fin
13. Finishing the front fin joints
14. Clusters along the back fin
15. Setting up the back fin joints
16. Binding the creature
17. Editing the deformations of the neck and head
18. Refining the deformations of the back fins
19. Correcting the deformations of the ribcage and hip
20. Constraining the vertebrae and tail bones to their drive chains
21. Spline IK system for the vertebrae
22. Controlling the midsection of the vertebrae
23. Animation controls for the vertebrae
24. Finishing the animation controls for the vertebrae
25. The center of gravity control
26. Starting on the vertebrae’s twist rig
27. Completing the twist rig
28. Neck and head controls
29. Building FK controls for the tail
30. Continuing the FK tail rig
31. Connecting tail bones to FK controls / dynamically parenting the tail
32. Setting up a switch for the tail control system
33. Completing the FK tail rig
34. Starting the auto-overlap rig for the tail
35. Connecting the tail’s chain to its dynamic curve
36. Controlling the dynamic tail in real-time
37. Adding a global control / organizing the scene
38. Auxiliary controls for the extra tail bones
39. Rigging the front fins
40. Finishing the front fin controls
41. Setting up the back fins
42. Dynamically parenting the back fins
43. Toe controls
44. Finishing the toe controls
45. Simulating a swimming aquatic creature
46. Controlling the creature’s swim system
47. Finalizing the control rig
48. A discussion on animating the sea creature
حجم کل :

برای دسترسی به کل محتویات سایت عضو ویژه سایت شوید
برای نمایش این مطلب و دسترسی به هزاران مطالب آموزشی نسبت به تهیه اکانت ویژه از لینک زیر اقدام کنید .
دریافت اشتراک ویژه
مزیت های عضویت ویژه :
- دسترسی به همه مطالب سافت ساز
- آپدیت روزانه مطالب سایت از بهترین سایت های سی جی
- ورود نامحدود کاربران از هر دیوایسی
- دسترسی به آموزش نصب کامل پلاگین ها و نرم افزار ها
اگر در تهیه اشتراک ویژه مشکل دارید میتونید از این لینک راهنمایی تهیه اشتراک ویژه رو مطالعه کنید . لینک راهنما
For International user, You can also stay connected with online support. email : info@softsaaz.ir telegram : @SoftSaaz
امتیاز دهی به این مطلب :
امتیاز سافت ساز
لطفا به این مطلب امتیاز دهید ?


