دانلود پلاگین Aescripts Lockdown v3.0.2 برای افترافکت
Aescripts Lockdown for After Effects
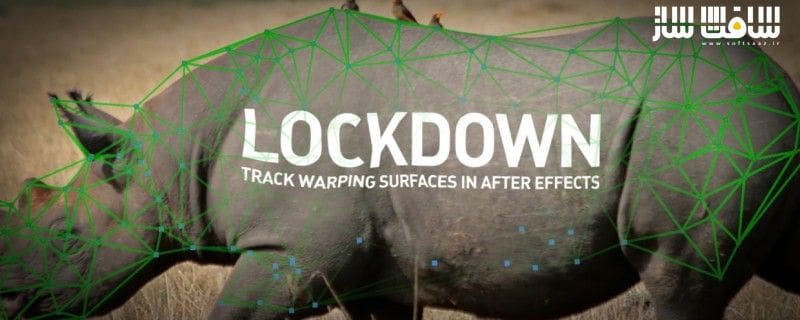
پلاگین Lockdown
Lockdown یک پلاگین قدرتمند و انقلابی افترافکت از شرکت Aescripts استکه به شما امکان می دهد سطوح پیچیده را در داخل افترافکت ردیابی و ترکینگ کنید ، این پلاگین برای کار جلوه های ویژه در افترافکت بسیار کاربردی و مفید است ، هرگز قبل از این پلاگین نمی توانستید سطوح پیچیده را به این راحتی ردیابی کنید ، آخرین نسخه این پلاگین توسط ســافــت ســاز برای شما کاربران عزیز، تهیه و آماده دانلود شده است.
ویژگی های این پلاگین :
- دارای فیلتر ترکینگ انتخابی
- با این پلاگین می توانید نقاط متحرک ایجاد یا دریافت کند
- ترکینگ نقاط ایجاد شده
- ردیابی و ترکینگ سطوح پیچیده در افترافکت
- نقاط را در رندر واقعی لایه ایجاد می کند
- ترکینگ های غیر متحرک را مخفی کنید
- اندازه پیکسل هاو نقاط به عنوان بخشی از لایه رندر می شود
- دارای امکان انتخاب همه نقاط ، بیرونی و داخلی در عکس
- دارای امکان پاک کردن مش
- ترکینگ اندازه پنجره
- امکان تعیین حداقل تعداد فریم برای هر ترکینگ
- و..

Aescripts Lockdown for After Effects
Lockdown is a revolutionary new plug-in that allows you to track warping surfaces inside After Effects.
This plugin is a game-changer for VFX work in After Effects. Never before could you track warping surfaces so easily!
NOTE: Please try the free demo by clicking on the green TRY button above before purchasing to make sure it works for your purposes. Please note that we only officially support After Effects 2019 and above.
Controls
To use the Plug-in, please follow the instructions labeled 1-9 in both the script and Plug-in. Start by opening the script under Window/Lockdown.jsxbin. Select the layer you’d like to track, then press button 1.
1) Pre-Compose
In order for the Lockdown Plug-in and script to work, the video must be in a composition which matches it’s own framerate and resolution, with no transform changes. This button Pre-Composes your footage “Leaving all Attributes”, enters the composition, and applies Lockdown to your footage.
2) Optional Tracking Filter
This optional script button applies effects that sometimes allow our tracker and Mocha to better identify textures. It’s basically an edge detect with a lot of contrast. You should be in 16 or 32-bit mode when using this filter. Running a denoiser on the original footage, and again on the final result also improves trackability. This is great for a shot where lighting is changing, because it brings out details in cracks and surfaces, and tends to ignore larger gradients. You’ll want to delete these effects once tracking is done, after Step 5.
3) Generate Points
Lockdown can either create or receive animated points, then it strings them together into a mesh to produce the warping effect. You need to create points if you’re using the built-in tracker. Please note the After Effects UI MUST BE ON to do this or any other interaction with Lockdown. If you can’t see your masks, anchor points, bezier handles, etc… Your After Effects Effect UI is off. Turn it back on.
UI Toggle: Control/Apple+Shift+H
Create Point: Control/Apple + Click
Create an array of points: Control/Apple Click and drag into a box shape.
Delete single point: Option/alt+Click
Delete within a box: Option/alt+Click and drag rectangle
Select multiple points: Click and drag around them
or shift-click to add to selection.
Add extension points: Ctrl/CMD+shift+option/alt+click
Click ‘nothing’ to de-select
Please note that you can only draw points on one frame at a time. If you draw points on frame 1, then go to frame 20, and create a new point, all frames will be re-located to frame 20. (This was not an intentional design choice, we hope to someday change this.)
4) Track Points
This takes all the points in the step above and attempts to track them to the footage. This process usually takes a few minutes depending on the length of the shot, amount of points, resolution, etc… You MUST keep the Lockdown Effect selected while tracking, with After Effects up and activated. Sorry for the inconvenience, again, this was not an intentional design choice, but a limitation of our first version.
After your first round of tracking, we’d recommend watching your footage very closely. You may need to add more tracks. When a track is not visible, that means it has no keyframes on that frame. You may choose to go back to step 3 and add more tracking points, then press this button again to add these new points to the track. To edit tracks manually, please check out the sections on “Internalize Selected Points” and “Externalize Selected Points”.
4.1) Delete backward keyframes
For the selected keyframes, delete all keyframes earlier in time. Useful for quickly cleaning tracks.
4.2) Delete forward keyframes
For the selected keyframes, delete all keyframes later in time.
5) Interpolate Partial Tracks
This button is necessary 99% of the time. Let’s say you have a shot that’s 100 frames long. You have a handful of tracks at the beginning that all die off (contain no keyframe data) after the first 60 frames, so the range is 1-60. You also have tracked points from the end of the shot, that are from the range 40-100. Your two sets of tracks overlap between frames 40-60.
By pressing this button, at the time at which any tracks are “dead” and having no keyframes, they will find “living” tracks around them and follow their motions. So even if a track does not live for the entire length of the shot, it can follow your surface VERY accurately by piggybacking on the tracks later in the shot. This solves the problem of tracks just sitting entirely still when they die, and causing parts of your mesh to freeze.
The motion from interpolation is represented by keyframes, so in the previous example, all of your keyframe tracks would now show keyframes from the range 1-100, rather than their previous ranges. This interpolation can be toggled on and off, deleting the “interpolated” keyframes as many times as you’d like.
The only limitation to be aware of is this works best with “internalized” keyframes. If you’re using this option with “externalized” keyframes, you run the risk of the interpolation being baked into the keyframe tracks permanently. It’s recommended that all tracks are always internalized when using this option. If you find yourself deleting bad points, or adding new points, you should toggle this option off to delete the previous set of interpolated keys, and then on again to re-generate new interpolation based on your hand cleaned tracks.
6) Generating a mesh and “Auto Triangulate Mesh”
Create Mesh Edge: To manually connect two TRACKED points, select one, then Control/Command + Shift + click another point.
Lockdown can only render quads and triangles. Green lines represent the borders of Quads and Triangles, white lines represent lines that are part of incomplete geometry and not contributing to the mesh. There is no concept of “faces” in Lockdown with which the user can interact. Faces are determined by edge connections.
Delete edge: Option/Alt+Click
Auto Triangulate Mesh: Press the button. Please note that quads often render smoother than triangles. Manually drawing a mesh into quads can often provide better results. One easy way to compensate for this, however, is to have MANY dense tracking points, in which triangles will look great.
7) Apply Mesh on this frame
This button takes the current frame and determines that this is the hero frame you wish to draw on. Lockdown now stabilizes the entire video to this frame. This can be undone and re-done over and over and over again without consequence by pressing this button. It’s recommended to “Apply Mesh” on a frame in which your tracked object is largest, or flattest towards the camera so it’s easiest to paint on.
At this point you should watch your stabilized composition very carefully. If you see any areas sliding, that means you didn’t put enough tracking markers on them. You can press “Apply Mesh” again to clear your stabilization. Create some new tracking points, re-toggle “interpolate partial tracks”, then connect these new points to your mesh as described in step 6. When you press “Apply Mesh” again, you will be back to where you just were, but now with new tracking points contributing to stabilization. One last thing to keep in mind, when the mesh is “applied” it only stabilizes within the bounds of the existing trackers. so for example, if you only put tracking markers on a persons face in your shot, when you “apply” the mesh, only the face will be visible, and the body and other areas without geometry on them will be Alpha-0 transparent.
8) return to Lockdown Script
Just a reminder that to actually finish this shot, you need the script again.
این راهنمای نصب به صورت نوشته می باشد .

برای دسترسی به کل محتویات سایت عضو ویژه سایت شوید
برای نمایش این مطلب و دسترسی به هزاران مطالب آموزشی نسبت به تهیه اکانت ویژه از لینک زیر اقدام کنید .
دریافت اشتراک ویژه
مزیت های عضویت ویژه :
- دسترسی به همه مطالب سافت ساز بدون هیچ گونه محدودیتی
- آپدیت روزانه مطالب سایت از بهترین سایت های سی جی
- بدون تبلیغ ! بله با تهیه اکانت ویژه دیگه خبری از تبلیغ نیست
- دسترسی به آموزش نصب کامل پلاگین ها و نرم افزار ها
اگر در تهیه اشتراک ویژه مشکل دارید میتونید از این لینک راهنمایی تهیه اشتراک ویژه رو مطالعه کنید . لینک راهنما
For International user, You can also stay connected with online support. email : info@softsaaz.ir telegram : @SoftSaaz
حجم کل :
حجم فایلهای دانلودی : 1.28 گیگابایت
دانلود پلاگین Aescripts Lockdown v3.0.2 برای افترافکت
پسورد : softsaaz.ir
امتیاز دهی به این مطلب :
امتیاز
لطفا به این مطلب امتیاز دهید