آموزش ایجاد محیط در نیوک NUKE
Creating a Futuristic Set Extension in NUKE
ایجاد محیط در نیوک
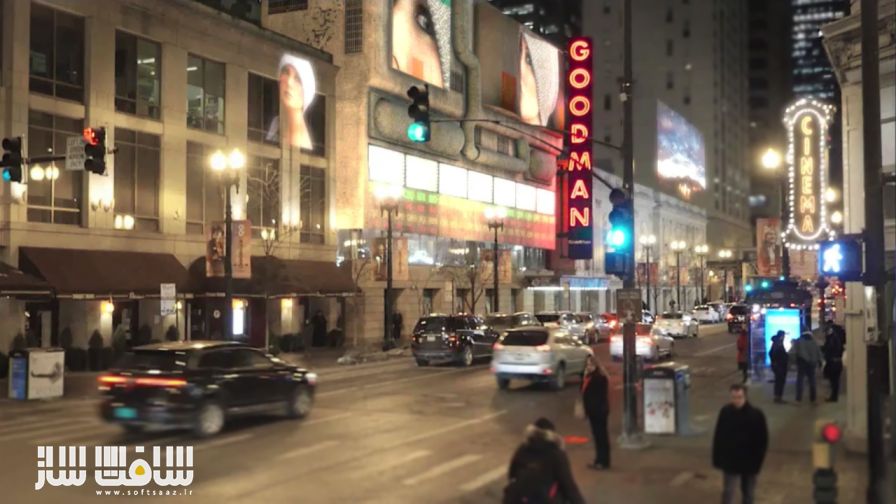
در این آموزش ” ایجاد محیط در نیوک ” از شرکت Digital Tutors مربی دوره Matt Skonicki ، چگونگی یکپارچه کردن و بروز رسانی معماری ساختمان مربوط به آینده و مدرن و بروز کردن زیر ساختهای آن در Maya 2015, Nuke 9X به شما عزیزان می آموزد . همچنین نحوه ایجاد منظره مربوط به آینده مثل :چشمک زدن چراغ های خیابانی ، پس زمینه های توسعه یافته و … . در پایان آموزش شما قادر خواهید بود که یک شات طبیعی از یک خیابان شهری مدرن در روز بگیرید و به یک محیط کاملا مربوط به آینده تبیدل نمایید. با سافت ساز همراه باشید .
عناوین اصلی این دوره آموزشی :
- استفاده از حالت ادیت برای نود ModelBuilder
- ایجاد انحنای ساختمان منحنی
- تکنیک های ایجاد پیاده رو
- اکسپورت هندسه از نیوک
- ساخت تکسچر در فتوشاپ
- تنظیم انجین scanline برای ساختمان
- تطبیق نور صحنه
- افزودن درخشندگی به رندر برای صفحه های LCD
- استفاده از موشن بلور و درجه بندی رنگ
- قرار دادن فیلم های هولوگرام به صحنه
- ایجاد محیط در نیوک
- و …
لطفا قبل از دانلود پیشنمایش دوره را مشاهده فرمایید:
عنوان دوره : Digital Tutors – Creating a Futuristic Set Extension in NUKE
سطح : پیشرفته
زمان کل دوره : 3 ساعت
تعداد فایل های تصویری : 32
سال آموزش : 2015
فایل تمرینی : دارد
مربی دوره : Matt Skonicki
نرم افزار : Nuke 9X , Maya 2015
زیرنویس : ندارد
Digital Tutors – Creating a Futuristic Set Extension in NUKE
In this tutorial we’ll learn how to retro-fit futuristic architectural buildings over modern-day infrastructure using Nuke 9X and Maya 2015. We will learn how to create futuristic landscapes, flickering street lights, and set extended backgrounds. Software required: Nuke 9X and Maya 2015.
Introduction and project overview
Examining the solved camera for the plate shot
Using the edit mode in the ModelBuilder node
Creating the initial plane for the curved building
Building out the windows for the curved building
Creating the curvature of the curved building
Aligning a cube to a garbage bin
Techniques to creating the sidewalk
Exporting out geometry from Nuke
Laying out UV’s in Maya
Setting up a image plane to see footage in Maya
Exporting the geometry back into Nuke
Exporting UV and occlusion maps out of Maya
Building up our initial texture Photoshop file
Breaking out our Photoshop file layers in Nuke
Setting up our scanline render for the buildings
Preparing our occlusion render for the buildings
Light matching our scene
Matching lamp light intensities for further light matching
Adding the glow render for our LCD screens
Utilizing motion blurs and color grading
Adding additional glows and flickering to the LCD screens
Inserting hologram movies into the scene
Adding a hologram stock ticker to the building
Reconstructing lost elements using roto techniques
Final tweaks and animations
Setting up the camera projections for sign replacement
Adding in the new sign
Utilizing glows to light the new sign
Creating the foreground roto of our pedestrian crossing sign
Critique of final render and conclusion
حجم کل :

برای دسترسی به کل محتویات سایت عضو ویژه سایت شوید
برای نمایش این مطلب و دسترسی به هزاران مطالب آموزشی نسبت به تهیه اکانت ویژه از لینک زیر اقدام کنید .
دریافت اشتراک ویژه
مزیت های عضویت ویژه :
- دسترسی به همه مطالب سافت ساز
- آپدیت روزانه مطالب سایت از بهترین سایت های سی جی
- ورود نامحدود کاربران از هر دیوایسی
- دسترسی به آموزش نصب کامل پلاگین ها و نرم افزار ها
اگر در تهیه اشتراک ویژه مشکل دارید میتونید از این لینک راهنمایی تهیه اشتراک ویژه رو مطالعه کنید . لینک راهنما
For International user, You can also stay connected with online support. email : info@softsaaz.ir telegram : @SoftSaaz
امتیاز دهی به این مطلب :
امتیاز سافت ساز
لطفا به این مطلب امتیاز دهید


