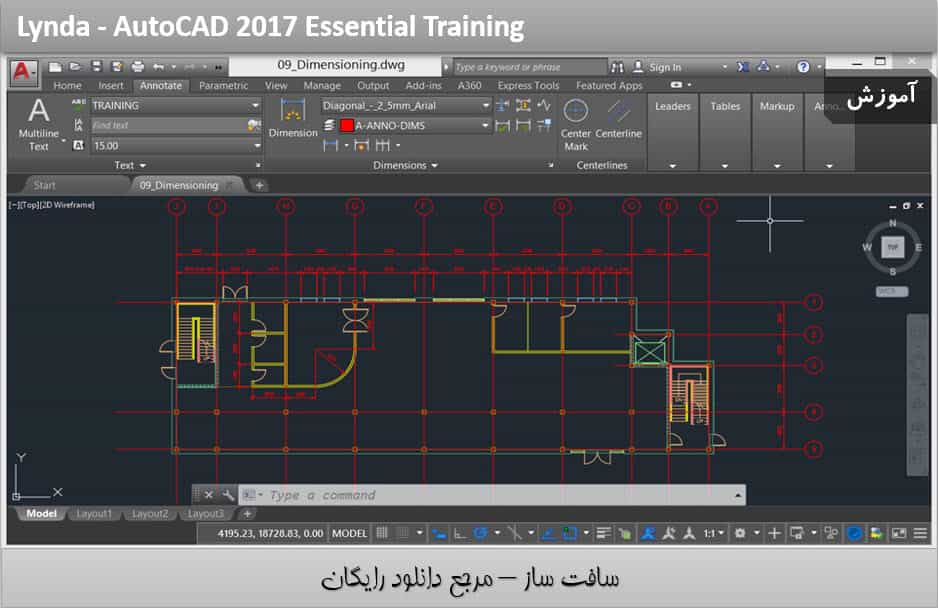
آموزش کامل اتوکد 2017 AutoCAD
AutoCAD 2017 Essential Training
آموزش کامل اتوکد
هر چیزی که نیاز به دانستن، برای ایجاد دقیق ترسیم های 2D و 3D با آموزش کامل اتوکد را در این دوره آموزشی از شرکت Lynda خواهید آموخت. این آموزش ها برای مبتدیان با مهارت های مورد نیاز برای استفاده موثر از اتوکد 2017 در هر صنعتی : معماری ، مهندسی ، ساخت و ساز ، تولید و یا طرحی محصول آماده شده است.
مربی تایید شده Autodesk این دوره آموزش کامل اتوکد ، آقای Shaun Bryant ، به بررسی اینترفیس برنامه و آموزش گام به گام ابزارها ، منو ها و ویژگی های اتوکد می پردازد. چگونگی ایجاد و مادیفای هندسه ، لایه ها ، بلاک ها ، ابعاد ها و لایوت ها را یاد می دهد.
نحوه ترسیم دقیق با snapping اتوکد و مختصات مدل ، اضافه کردن متن و حاشیه نویسی ، اشتراک گذاری کار هاتون با دیگران ، خروجی گرفتن از ترسیم تون در فرمت های مختلف ، از جمله مواردی است که در این دوره آموزشی ارائه شده در سافت ساز خواهید آموخت. با سافت ساز همراه باشید.
عناوین اصلی آموزش کامل اتوکد :
- بررسی رابط کاربری اتوکد
- تبدیل واحد های ترسیم
- استفاده از فایلهای قالب DWT
- زوم و حرکت در اطراف ترسیم
- نقشه کشی هندسه و آبجکت های ساده
- حرکت ، مقیاس و چرخش
- استفاده از Fillet و Chamfer
- ترسیم با snapping و مختصات
- اضافه کردن hatching و گرادیانت
- افزودن متن به نقشه
- کار با ابعاد
- ایجاد بلاک با قابلیت استفاده مجدد
- طراحی جداول در اتوکد
- ایجاد طرح بندی (لایوت)
- افزودن حایشه نویسی
- خروجی گرفتن از ترسیم
- آموزش کامل اتوکد
- و …
پیش نمایش دوره آموزش کامل اتوکد :
عنوان دوره : Lynda – AutoCAD 2017 Essential Training
سطح : مناسب برای همه
زمان کل دوره : 8.40 ساعت
تعداد فایل های تصویری : 104
سال آموزش : 2016
فایل تمرینی : دارد
مربی دوره : Shaun Bryant
نرم افزار : AutoCAD 2017
زیرنویس : ندارد
Lynda – AutoCAD 2017 Essential Training
Learn everything you need to know to create precise 2D and 3D drawings with AutoCAD 2017. These tutorials provide AutoCAD beginners (and pros who want to learn more) with the skills required to use AutoCAD 2017 effectively in any industry—architecture, engineering, construction, manufacturing, or product design. Autodesk Certified Instructor Shaun Bryant reviews the user interface and leads you step-by-step through all of AutoCAD’s tools, menus, and features. Learn how to create and modify geometry, layers, blocks, dimensions, and layouts. Find out how to draw more accurately with AutoCAD’s snapping and coordinate model, and add text and annotations that help others understand your drawings. Ready to share your work with others? Discover how to output your drawings in a variety of formats. Even experienced AutoCAD pros can find something new to learn.
- Exploring the AutoCAD interface
- Converting drawing units
- Using DWT template files
- Zooming and panning around drawings
- Drawing simple geometry and objects
- Moving, scaling, and rotating
- Using Fillet and Chamfer
- Drawing with snapping and coordinates
- Adding hatching and gradients
- Adding text to drawings
- Working with dimensions
- Grouping objects
- Creating reusable blocks
- Designing tables
- Working with XREFs
- Creating layouts
- Adding annotations
- Outputting drawings
1. Exploring the User Interface
Exploring the user interface 4m 39s
Using the ribbon 7m 17s
Changing workspaces 5m 48s
Using the status bar 4m 19s
Using the drawing tabs 4m 33s
Using the navigation bar 5m 19s
Using the ViewCube 5m 16s
The shortcut menu 5m 6s2. Managing Files and Options
Opening, saving, and closing files 7m 11s
Setting drawing units 6m 41s
Converting drawing units 5m 42s
Editing and managing options 5m 13s
Using template files—DWT 6m 11s3. Navigating Drawings
Using Zoom commands 3m 52s
Using pan 2m 56s
Using the mouse 2m 47s
Using the ViewCube 5m 13s
Using the navigation bar 7m 5s
Model and layout 5m 47s
Saving and restoring views 4m 4s4. Drawing Objects
Lines 6m 35s
Circles 3m 55s
Arcs 4m 1s
Ellipses 4m 9s
Polylines and splines 7m 56s
Rectangles and polygons 7m 29s
Points and donuts 6m 48s5. Modifying Objects
Selecting objects 6m 58s
Using Move and Copy 4m 30s
Using Scale and Rotate 4m 38s
Creating and using arrays 8m 6s
Using Offset and Mirror 4m 55s
Using Trim and Extent 5m 31s
Using Stretch and Lengthen 5m 48s
Using Break and Join 3m 48s
Using grips and grip editing 4m 55s
Using boundaries 3m 14s
Using Fillet and Chamfer 6m 34s
Using Divide and Measure 4m 57s
Editing polylines and splines 4m 59s6. Drawing Accurately
Using Grid and Snap 6m 10s
Working with coordinates 6m 6s
Using Polar Tracking 6m 11s
Using Dynamic Input 4m 53s
Using object snaps 5m 3s
Using object-snap tracking 5m 7s
Using ISODRAFT with isometric drawings 5m 25s7. Hatching and Gradients
Using the Hatch command 4m 54s
Using the Gradient command 3m 20s
Editing hatches and gradients 5m 46s8. Using Text
Working with text styles 5m 45s
Single-line text 5m 59s
Multiline text (MTEXT) 5m 30s
Aligning text 2m 56s
Framing text in a title block 7m 54s9. Dimensioning
Working with dimension styles 6m 15s
Using dimensions 6m 51s
Editing dimensions and dimension overrides 6m 15s
Breaking dimensions 3m 59s
Spacing dimensions 5m 9s
Continue dimensions 3m 47s
Baseline dimensions 2m 3s
Automatic dimensioning 3m
Using multileaders 5m10. Object and Layer Properties
Working with object properties 4m 27s
Changing the linetype scale 4m 34s
Using Hide and Isolate 3m 32s
New layers and the Layer dropdown menu 5m 20s
Using the layer tools 6m 1s
Other layer tools 3m 26s11. Reusing Content
Grouping objects 4m 20s
Creating and using blocks 6m 48s
Redefining block definitions 2m 32s
Using the Explode command 3m 6s
Creating a simple dynamic block 7m 23s
Using WBLOCK 5m
Accessing external blocks from the Internet 4m 31s12. Attributes and Tables
Working with attribute definitions 5m 45s
Creating a block with attributes 4m 58s
Working with table styles 5m 16s
Designing a table 6m 1s
Adding fields to a table 8m 1s13. External References
Working with XREFs 3m 13s
Attaching and overlaying XREFs 4m 6s
Clipping XREFs 3m 10s
Editing XREFs 4m 7s
Editing XREFs in place 2m 52s14. Layouts and Annotation
Creating a layout and adding a viewport 5m 36s
Locking viewports 3m 20s
Freezing viewport layers 3m 23s
Adding a title block: Part 1 5m 48s
Adding a title block: Part 2 6m 29s
Using annotative text styles 4m 36s
Using annotative dimensions 8m 21s
Using revision clouds 4m 34s15. Creating Output
Page setups 5m 15s
Plotting from Model and Layout tabs 5m 25s
Packaging with eTransmit 4m 45s
Batch plotting 6m 29s
Outputting to different file formats 4m 55s
حجم کل :

برای دسترسی به کل محتویات سایت عضو ویژه سایت شوید
برای نمایش این مطلب و دسترسی به هزاران مطالب آموزشی نسبت به تهیه اکانت ویژه از لینک زیر اقدام کنید .
دریافت اشتراک ویژه
مزیت های عضویت ویژه :
- دسترسی به همه مطالب سافت ساز
- آپدیت روزانه مطالب سایت از بهترین سایت های سی جی
- ورود نامحدود کاربران از هر دیوایسی
- دسترسی به آموزش نصب کامل پلاگین ها و نرم افزار ها
اگر در تهیه اشتراک ویژه مشکل دارید میتونید از این لینک راهنمایی تهیه اشتراک ویژه رو مطالعه کنید . لینک راهنما
For International user, You can also stay connected with online support. email : info@softsaaz.ir telegram : @SoftSaaz
امتیاز به این مطلب :
امتیاز سافت ساز
لطفا به این مطلب امتیاز دهید :)


