آموزش مدلسازی و طراحی جواهرات در راینو Rhino
Lynda – Rhino: Learn Basic Jewelry Modeling
مدلسازی و طراحی جواهرات
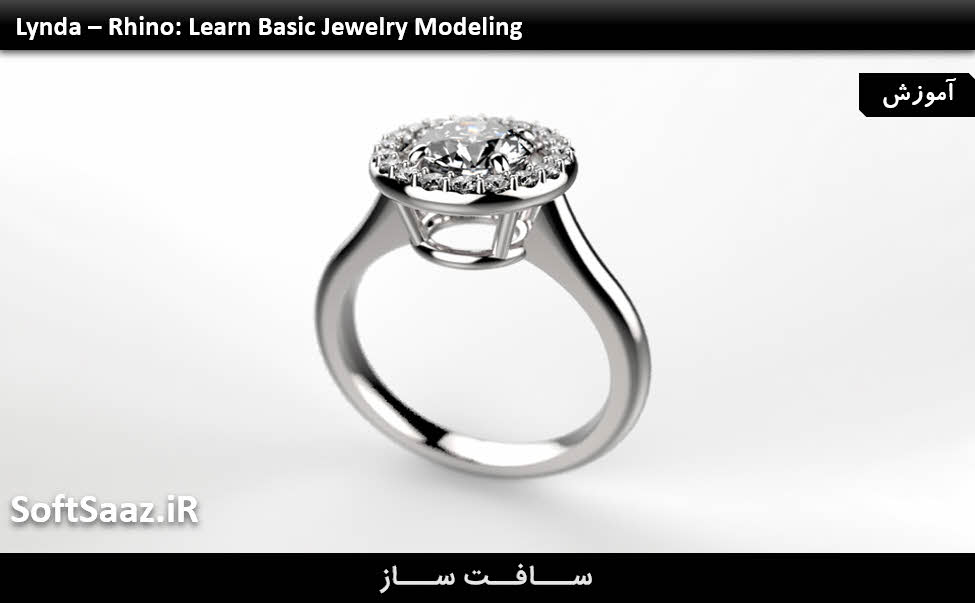
راینو نرم افزاری پیشتاز در زمینه طراحی و تولید جواهرات است که برای ساخت قطعات نمونه برای نشان دادن به مشتریان و استادکارها و تهیه نقشه های CAD نهایی برای چاپ سه بعدی و فرزکاری مورد استفاده قرار می گیرد.در این دوره ” مدلسازی و طراحی جواهرات ” از سایت Lynda در نرم افزار Rhino ، مربی دوره Jean Gorospe ،تکنیک های مدل سازی جواهرات را با راینو نشان می دهد.
در این دوره با استفاده از نرم افزار Rhino 5 چهار قطعه می سازیم: یک حلقه بیضی شکل ساده، یک حلقه نامزدی پیچیده تر، یک گوشواره با سنگ کابوشن و یک دستبند لعابکاری شده. این تکنیک ها شامل ساخت اشکال هندسی ساده، استفاده از Sweep و Loft، Fillet و Offset می باشند.در این دوره طریقه ساخت قطعات و سطوح ساده و پیچیده را یاد می گیرید و در انتهای این دوره می توانید آموخته هایتان را روی ایده ها و طرح های خود پیاده کنید. با سافت ساز همراه باشید.
عناوین اصلی دوره مدلسازی و طراحی جواهرات :
- تنظیم اینترفیس
- تنظیم پالت لایه
- ایمپورت پروفایل سنگی و اندازه گیری منحنی حلقه
- ساخت یک حلقه ساده با سنگ بیضی شکل
- ساخت یک حلقه نامزدی
- اجرای دستورات Sweep و Pipe روی شکل ها
- ساخت قلاب گوشواره
- مدل سازی یک دستبند لعابکاری شده ساده
- نرم کردن لبه ها برای راحتی
- ویرایش طرح خطی روی دستبند
- و …
پیش نمایش دوره مدلسازی و طراحی جواهرات :
عنوان دوره : Lynda – Rhino: Learn Basic Jewelry Modeling
سطح : متوسط
زمان کل دوره : 2.40 ساعت
تعداد فایل های تصویری : 37
سال آموزش : 2016
فایل تمرینی : دارد
مربی دوره : Jean Gorospe
نرم افزار : Rhino
زیرنویس : ندارد
Lynda – Rhino: Learn Basic Jewelry Modeling
Rhino is the leading software to design and produce professional jewelry, used for creating prototypes to share with clients and craftsmen and preparing final CAD drawings for 3D printing and milling. Designer Jean Gorospe is excited to share his Rhino jewelry modeling techniques with you. In this course, you’ll use Rhino 5 to create four pieces: a basic oval ring, a more complex engagement ring, a cabochon drop earring, and an enamel cuff. These techniques cover basic geometry buildout, sweeps and lofts, fillets, and offsets. You will learn workflows to create basic and complex parts and surfaces and, by the end of the course, be able to apply the knowledge to your own jewelry concepts and designs.
Topics include:
Setting up the user interface
Setting up the layer palette
Importing stone profiles and ring curve measurements
Building out the shank and bezel
Sweeping and piping shapes
Filleting edges
Laying stones and prongs
Offsetting an inner surface
Editing decorative line art
Softening jewelry edges for comfort
1. Setting Up the Interface and Options
Setting up the UI in Rhino 6m 32s
Setting up the pop-up menu 2m 9s
Keyboard shortcuts and importing custom options 2m 32s
Quick demo using shortcuts 4m 2s
Setting up the layer palette 3m 36s
2. Making a Basic Oval Stone Ring
Importing the stone and ring size curve 3m 13s
Building the curves of the bezel 7m 8s
Sketching out the lines of the shank: Oval stone ring 7m 10s
Building the surfaces of the shank 2m 57s
Building the surfaces of the bezel 3m 3s
Shelling out the shank 8m 2s
Combining the bezel to the shank 4m 30s
Filleting the edges 4m 6s
3. Making an Engagement Ring
Importing the stone and ring size curve 1m 37s
Building the curves for the center stone 6m 32s
Sketching out the lines of the shank: Engagement ring 7m 40s
Revolving the curves to make the center section 7m
Using sweep to make the shank surface 3m 14s
Laying the small stones and prongs 5m 42s
4. Modeling a Cabochon Drop Earring
Importing the oval cabochon model 56s
Building the curves of the body 5m 7s
Sweeping and piping the shapes 7m 29s
Setting the stones and adding the prongs 7m 26s
Building the earring hook 6m 38s
5. Modeling a Basic Enamel Cuff
Importing the bracelet curve and building the side profile 4m 24s
Opening and rounding off the bottom opening 5m 11s
Offsetting the inner surface to create the cuff 2m 13s
Creating the thickness for the cuff 3m 52s
Using offset to build up the edges of the cuff 5m 5s
Unwrapping the surface to apply line art 3m 50s
Editing the line art on the cuff 3m 56s
Offsetting the surface to establish the enamel floors 5m 15s
Softening the edges for comfort 5m 2s
حجم کل :

برای دسترسی به کل محتویات سایت عضو ویژه سایت شوید
برای نمایش این مطلب و دسترسی به هزاران مطالب آموزشی نسبت به تهیه اکانت ویژه از لینک زیر اقدام کنید .
دریافت اشتراک ویژه
مزیت های عضویت ویژه :
- دسترسی به همه مطالب سافت ساز
- آپدیت روزانه مطالب سایت از بهترین سایت های سی جی
- ورود نامحدود کاربران از هر دیوایسی
- دسترسی به آموزش نصب کامل پلاگین ها و نرم افزار ها
اگر در تهیه اشتراک ویژه مشکل دارید میتونید از این لینک راهنمایی تهیه اشتراک ویژه رو مطالعه کنید . لینک راهنما
For International user, You can also stay connected with online support. email : info@softsaaz.ir telegram : @SoftSaaz
امتیاز دهی به این مطلب :
امتیاز سافت ساز
لطفا به این مطلب امتیاز دهید ?


