تسلط کامل بر Pyro در Houdini از RebelWay
RebelWay – Mastering Pyro in Houdini

تسلط کامل بر Pyro در Houdini
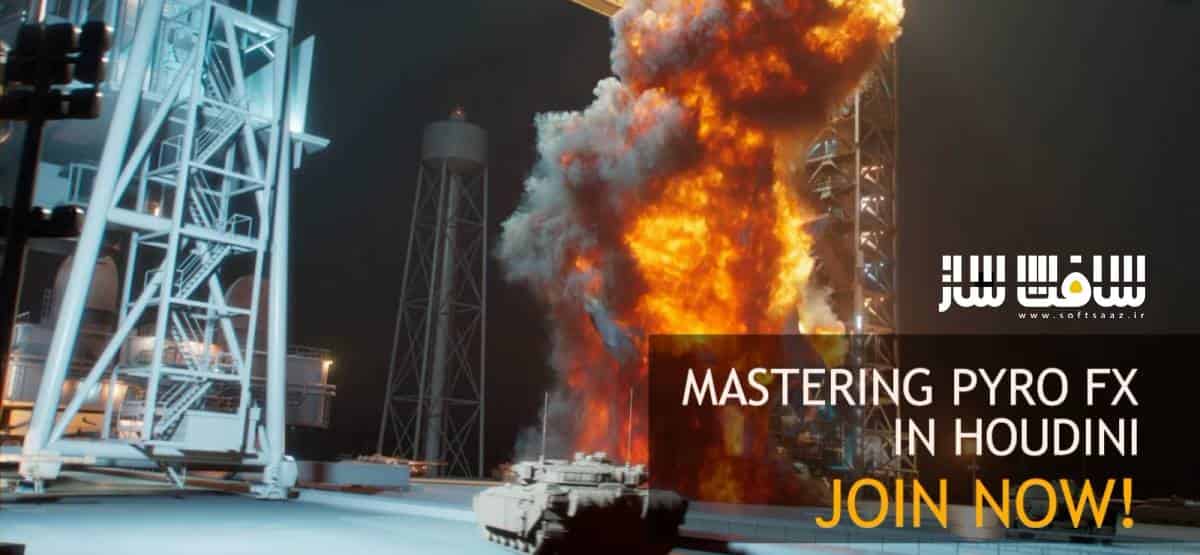
این دوره تسلط کامل بر Pyro در Houdini توسط گروه مطرح Rebelway در ۱۰ هفته تولید شد . این آموزش به صورت عمیق به چگونگی تولید Pyro FX با کیفیت و حرفه ای با استفاده از نرم افزار Houdini و چگونگی ایجاد یک Solver سفارشی برای دستیابی به ظاهر خیره کننده می پردازد. تمرکز این دوره بر رندر گرفتن انفجار و Volume با استفاده از پلاگین Arnold Renderer می باشد. این دوره آموزشی توسط تیم ســافــت ســاز برای شما عزیزان تهیه شده است.
عناوین اصلی آموزش تسلط کامل بر Pyro در Houdini :
- هفته ۱ : آموزش اصول و نحوه کار Smoke Solver در هودینی به همراه ۲ تمرین شبیه سازی
- هفته ۲ : آموزش اصول و نحوه کار Pyro Solver در هودینی و ساختن آتش و انفجار و توضیح اینکه چرا باید Solver سفارشی برای خودتان بسازید.
- هفته ۳ : ساخت یک Solver سفارشی برای خلاص شدن از ظاهر قارچی در شبیه سازی ها و ساخت انواع FX با استفاده از آن.
- هفته ۴ : اضافه کردن یک سری ویژگی های بیشتر و در درجه اول اضافه کردن توانایی برای ایجاد آتش و ساخت انواع افکت با آن ( مانند آنچه در ویدئو آمده)
- هفته ۵ : بهبود دادن Solver ساخته شده با اضافه کردن مدل احتراق سفارشی به طوری که بتوان انواع مختلفی از انفجارها را با آن ساخت
- هفته ۶ : اضافه کردن ویژگی ها بیشتر به Solver ساخته شده در قسمت های گذشته و یادگیری چگونگی ایجاد منابع پیچیده.
- هفته ۷ : نگاه عمیق تر و دقیق، ساخت Volume Displacement بدون ساختن Rest Field، ساختن Color Field و یکسری ویژگی ها پیشرفته
- هفته ۸ و ۹ : ورود به دنیای Arnold Renderer و آموزش رازهای ایجاد افکت های حجمی بسیار طبیعی، در این ۲ هفته، شبیه سازی های ساخته شده در هفته های گذشته با روش های مختلف رندر میشوند. همچنین نحوه نورپردازی و تنظیم مراحل رندر برای دستیابی به خروجی بهینه بحث میشود.
- هفته ۱۰ : در این هفته ترکیب و کامپوزیت خروجی ها آموزش داده میشود
عنوان دوره : RebelWay – Mastering Pyro in Houdini
سطح : متوسط و پیشرفته
زمان کل دوره : 10 هفته
تعداد فایل های تصویری : 123
سال آموزش : 2020
فایل تمرینی : –
مربی دوره : Saber Jlassi , Igor Zanic, Urban Bradesko, Gavin (Chung)
نرم افزار : Houdini
زیرنویس انگلیسی : ندارد
RebelWay – Mastering Pyro in Houdini
This course is in depth lecture on how to create Highend pyro FX using Houdini and how to create a custom solver to achieve a unique look.
This course focuses on rendering highend volumes and explosions using Arnold.
We will start from week1 by building a good understanding of how smoke solver works in Houdini and create two simulations, the Tank shockwave and Rebelway logo as an exercise.
In week2 we will learn how to use the Pyro solver in Houdini and as an illustration we will learn how to create Explosions and Fire and learn why we need to create a custom solver.
Week3 we start creating our own solver that will get rid of the mushroom look once and for all and we will create a variety of FX element using it.
Week4 we will start adding more feature, and primarily the ability to create Fire and we will create various element(please refer to the video for the examples).
Week5 we continue improving our solver to add our own combustion model and to be able to simulation various types of explosions.
Week6 we continue adding more features to the solver and learn how to create more complex sourcing.
Wee7 we dive even deeper and start looking at adding volume displacement without creating rest fields, and learn how to create color fields and various other adv techniques.
Week8, 9 we dive into arnold and learn the secret to realistic volume rendering, go over a variety of the sims created during the workshop and render them while exploring different techniques each time.
then we take a look at how to light the factory and set up all the passes to render the scene efficiently.
Week10 Compositing
WEEK1 –
Intro to voxels and how to manipulate and create volume data in Houdini.
Intro to dops and smoke solver.
How does a smoke solver works.
Fume FX, Maya Fluids, and why Houdini Stands out.
Analyse various real explosions to set the goal for what we need to achieve.
Analyse various CG explosion done by big studio to understand where we are at in terms of volume rendering and simulation.
Iteration Iteration Iteration, how much tweaking do I need to get realistic sims.
Create the Tank shockwave FX as a first example to learn the basics of smoke solver and applying forces.
Create the Rebelway logo smoke simulation to further understand how to inject forces and sink density.
An in depth look at all the smoke solver settings and the best defaults that we need to use.
WEEK2 —
An in depth look at the Houdini Pyro Solver and how does it work
Create an explosion (possibly a nuclear explosion) to understand how the solver works and it’s limitations.
An in depth look at allthe forces microsolver that ships with Houdini and their limitations.
How to use Pyro Solver to create fire.
WEEK3 —
Learn all about microsolvers and how to properly utilize them.
Learn why we need a custom solver and set the goal that we need to achieve.
Create a custom solver smoke solver that get’s rid of the mushroom look once and for all using various microsolvers.
Add a very efficient way to create very detailed volumes without having to use super highres grids and by just combining various microsolvers.
Create a custom turbulence force that know where it needs to be applied and generates much more interesting details.
WEEK4 —-
Continue adding more features to our solver and this time we’re going to add support for creating Fire.
Create an engine thrust, and various other FX elements to further learn how to use the custom solver and tweak it.
WEEK5 —–
Continue working on the custom solver and add support for creating explosions with very complex expansions.
Add a very intelligent way that auto balances the explosion expansion, temperature and the speed at which it travels.
Extend the solver to add smarter noise masking features.
WEEK6 ——
An in-depth look at how to create various complex emission and tendrils.
Create a massive explosion using complex emission and our custom solver.
How to efficiently create collision and deal with highres meshes (robot simulation).
WEEK7 ——-
This is a much more advanced section where we will take a look at combining sop solver, pop solver, and dops.
Use vdb and volume vops to process the data while it’s being used by dops.
Learn how to optimize sim data and work efficiently with very large volumes.
Color advection.
WEEK8 ———
Implement a technique that allows to do rendertime displacement without having to sim rest fields.
Extend the custom solver to support creating custom volume fields that can be later used to create various complex shading FX.
Unlock the secret to rendering photo-realistic smoke and explosions.
An in depth look at rendering various sims using arnold 5.0 and the latest standard volume shader.
For FUN, learn how to create specular component on volumes.
WEEK9 ———
lighting the factory and how to setup all the passes needed to render the scene in the most efficient possible way without sacrificing the quality.
TIPS and Tricks!
WEEK10 ———-
Learn how to use arnold aovs to further tweak the volume.
How to get the most out of volume aovs and how to add extra details in comp.
حجم کل : 36.3 گیگابایت

برای دسترسی به کل محتویات سایت عضو ویژه سایت شوید
برای نمایش این مطلب و دسترسی به هزاران مطالب آموزشی نسبت به تهیه اکانت ویژه از لینک زیر اقدام کنید .
دریافت اشتراک ویژه
مزیت های عضویت ویژه :
- دسترسی به همه مطالب سافت ساز
- آپدیت روزانه مطالب سایت از بهترین سایت های سی جی
- ورود نامحدود کاربران از هر دیوایسی
- دسترسی به آموزش نصب کامل پلاگین ها و نرم افزار ها
اگر در تهیه اشتراک ویژه مشکل دارید میتونید از این لینک راهنمایی تهیه اشتراک ویژه رو مطالعه کنید . لینک راهنما
For International user, You can also stay connected with online support. email : info@softsaaz.ir telegram : @SoftSaaz
امتیاز به این مطلب :
امتیاز سافت ساز
لطفا به این مطلب امتیاز دهید :)


