آموزش توسعه کاراکتر در زیبراش ZBrush
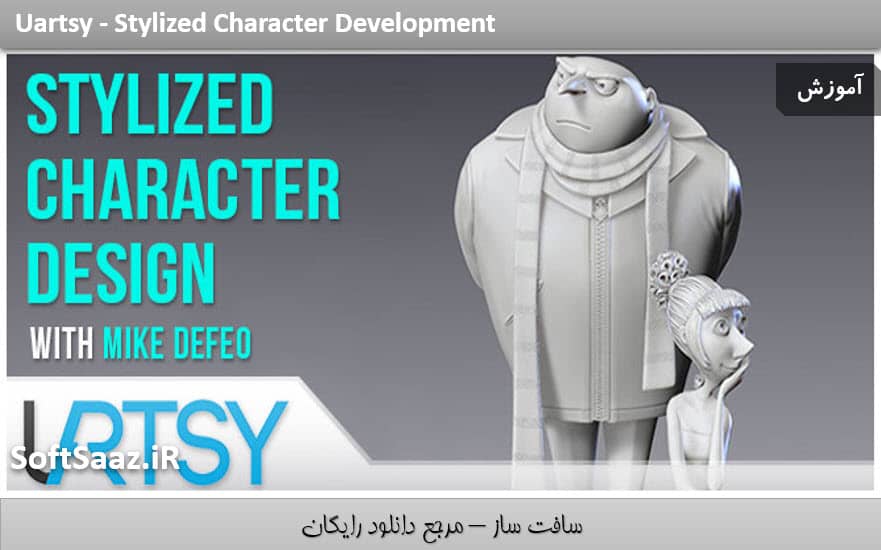
Uartsy – Stylized Character Development
توسعه کاراکتر در زیبراش
در این دوره آموزشی ” توسعه کاراکتر در زیبراش ” از سایت Uartsy در نرم افزار Zbrush ، مربی دوره Mike Defeo ، به ایجاد و طراحی یک کاراکتر فراموش نشدنی برای انیمیشن و توسعه کاراکتر تلطیف شده می پردازد. توسعه کاراکتر برای انیمیشن ، به اون راحتی که شما فکر میکنید ، نیست .
در این درس توسعه کاراکتر در زیبراش فوق العاده مایکل ، تکنیک ها و اصول طراحی که غول های صنعتی مانند : استودیو Blue Sky و Illumination Entertainment کمک کرده اند تا این کاراکتر زیبا طراحی بشود ، به شما مراجعین عزیز سافت ساز می آموزد. با سافت ساز همراه باشید. هر 10 پروژه در واقع یه دوره کامل از دوره توسعه کاراکتر در زیبراش می باشد.
5 درس مهم دوره توسعه کاراکتر در زیبراش :
- آشنایی و آموزش فرم و حجم 3D
- چگونگی اسکالپ کاراکتر برای انیمیشن با استفاده از اصل کلیدی طراحی
- آشنایی با appeal بودن کانسپت و قرار دادن آن در عمل به طراحی کاراکترتون
- آشنایی با چالش های که هنرمندان حرفه ایی کاراکتر با آنها روبرو و نقشی که در پایپ لاین انیمیشن بازی میکنند.
- تکنیک هایی برای گنجاندن حرکات کاراکتر و عبارات صورت در طراحی هایتان
این دوره آموزشی شامل 10 پروژه می باشد:
- ایجاد یک کانسپت و شروع به Block Out
- اتمام کردن Block Out
- ایجاد سر
- اسکالپتینگ مو
- اضافه کردن جزییات به موی سر
- مجسمه سازی سر سگ
- طراحی بدن سگ
- اسکالپتینگ لباس
- پوزینگ اسکالپ نهایی
- آماده کردن برای چاپ 3D
دیدن یکی از ویدیو های توسعه کاراکتر در زیبراش :
عنوان دوره : Uartsy – Stylized Character Development
سطح : تمام سطوح
زمان کل دوره : 20 ساعت
تعداد فایل های تصویری : –
سال آموزش : 2016
فایل تمرینی : دارد
مربی دوره : Mike Defeo
نرم افزار : Zbrush
زیرنویس : ندارد
Uartsy – Stylized Character Development
Developing stylized characters for animation is not as easy as you might think, and infusing those characters with timeless appeal is even harder. In this 10 module on-demand course, Michael Defeo will show you the techniques and design principles that have helped industry giants, like Blue Sky Studios and Illumination Entertainment, bring their most memorable characters to life.
The 5 most important lessons:
- How to understand and break down 3D forms and volumes
- How to sculpt a stylized character for animation using key design principles
- How to understand the concept of appeal and put it into practice as you design your own characters
- Understanding the challenges professional character artists face and the role they play in animation pipelines
- Tips for incorporating a character’s movement and facial expressions into your designs
Project 1 : Creating a Concept and Begining a Block Out
Lecture 1 07:15 Introduction to the Course
Lecture 2 09:41 Appeal
Lecture 3 09:57 Marrying Anatomy and Appeal
Lecture 4 11:46 Benefits of Teamwork in Production
Lecture 5 10:17 Using Simple Forms to Establish Volume
Lecture 6 09:09 Improving the Appeal of an Existing Model
Lecture 7 06:22 Introducing Our Project
Lecture 8 19:36 Creating a Neutral Concept
Lecture 9 18:26 Shoe and Arm
Lecture 10 23:05 A Discussion of Anatomy
Lecture 11 15:26 Mirroring
Lecture 12 Class Resources
Lecture 13 46:14 Meet and Greet Part 1
Project 2 : Finishing the Block Out
Lecture 1 23:18 Finger Blockout
Lecture 2 20:30 Duplicating the Fingers
Lecture 3 16:01 Creating the Thumb and Placing the Hand
Lecture 4 18:45 Wrist and Elbow
Lecture 5 20:37 Cleaning Up the Leg
Lecture 6 25:06 Cleaning Up the Torso
Lecture 7 15:14 Dynameshing and ZRemeshing the Character
Project 3 : Creating the Head
Lecture 1 Mod 3 Resources
Lecture 2 24:54 Head Sculpting Technique Part 1
Lecture 3 21:34 Head Sculpting Technique Part 2
Lecture 4 21:12 Creating the Head and Teeth
Lecture 5 20:38 Sculpting the Teeth and Refining the Mouth
Lecture 6 18:25 Tweaking the Mouth, Eyes, and Brow
Lecture 7 24:40 More Facial Adjustments
Lecture 8 22:03 Continuing to Paint Face and Eyes
Lecture 9 02:02 Fixing Symmetry
Lecture 10 04:00 Creating Eyelashes
Project 4 : Sculpting the Hair
Lecture 1 15:09 Adjusting the Face
Lecture 2 14:57 Adjusting the Ears
Lecture 3 13:18 Sculpting the Eyebrows
Lecture 4 14:17 Creating a Base for the Hair
Lecture 5 16:58 Creating a Base for the Ponytail
Lecture 6 11:26 Adjusting the Head and Hair
Lecture 7 17:37 Sculpting the Bangs
Lecture 8 22:35 Sculpting the Ponytail
Lecture 9 16:03 Adding High Frequency Details to the Hair
Lecture 10 13:46 Refining the Bangs
Project 5 : Adding More Detail to the Hair
Lecture 1 19:17 Utilizing Curve Brushes For Hair
Lecture 2 19:51 Creating Variance In the Hair
Lecture 3 19:20 Adding Curve Detail to the Ponytail
Lecture 4 12:18 Final Touches on the Hair
Lecture 5 18:33 FiberMesh Run Through
Lecture 6 21:59 Redoing the Eyebrows
Lecture 7 20:30 Adjusting the Eyes, Lips, Boots, and Gloves
Lecture 8 14:59 More Adjustments, UVs and Surface Noise
Project 6 : Sculpting the Dog Head
Lecture 1 24:49 Surface Noise and Sculpting the Dog Head Part 1
Lecture 2 29:14 Sculpting the Dog Head Part 2
Lecture 3 20:46 Defning Hair Flow
Lecture 4 19:43 Creating Specific Hair Shapes
Lecture 5 21:23 Making and Utilizing a Fur Brush
Lecture 6 22:13 Adding Individual Hairs
Lecture 7 09:20 Hair Tufts Using Curve Tubes Snap
Project 7 : Creating the Dog Body
Lecture 1 22:42 Modifying the Dog Head and Poly Painting
Lecture 2 14:32 Blocking Out the Dog Body
Lecture 3 14:56 Detailing the Dog Suit
Lecture 4 19:24 Refining the Dog Suit
Lecture 5 21:32 Fnishing the Dog Suit and Detailing the Female Suit
Lecture 6 23:29 Refining the Female Suit
Project 8 : Sculpting Clothing
Lecture 1 23:03 Drapery Overview
Lecture 2 21:18 Basic Wrinkles
Lecture 3 19:47 Sculpting Pants
Lecture 4 19:19 Dress and Collar
Lecture 5 20:56 Jacket with Collar
Lecture 6 17:59 Cape Part 1
Lecture 7 16:14 Cape Part 2
Project 9 : Posing the Final Sculpt
Lecture 1 Module 9 Resources
Lecture 2 19:42 Sculpting the Boot
Lecture 3 23:35 Refining Boots and Hands
Lecture 4 19:42 Posing the Body
Lecture 5 20:12 Posing the Neck and Resculpting Anatomical Landmarks
Lecture 6 20:02 Tweaking the Pose
Lecture 7 28:04 Adjusting the Legs and Lower Torso
Lecture 8 28:10 Honeing in on the Final Look
Lecture 9 19:22 Posing the Left Hand
Lecture 10 20:28 Posing the Right Hand
Lecture 11 23:39 Adding Straps and Tubes
Lecture 12 18:29 Final Touches on the Dog
Lecture 13 18:14 Final Adjustments to the Pose
Lecture 14 25:11 Turntable Rendering
Project 10 : Prepping for 3D Print
Lecture 1 14:01 3D printing preparation and tips
Lecture 2 13:01 Cutting the model parts for 3D printing
Lecture 3 14:03 Preparing the helmet parts for printing
Lecture 4 08:25 Preparing the head for printing
Lecture 5 09:08 Preparing the torso for printing
Lecture 6 11:34 Preparing other parts for 3d printing
Lecture 7 08:13 Tweaks and final adjustments
Lecture 8 11:06 Sending the model for printing
Lecture 9 22:35 Cleaning Up and Assembling 3D prints
Project 11 : Critiques (Class of January 2014)
Project 12 : Crits (Class of June 2014)
حجم کل :

برای دسترسی به کل محتویات سایت عضو ویژه سایت شوید
برای نمایش این مطلب و دسترسی به هزاران مطالب آموزشی نسبت به تهیه اکانت ویژه از لینک زیر اقدام کنید .
دریافت اشتراک ویژه
مزیت های عضویت ویژه :
- دسترسی به همه مطالب سافت ساز
- آپدیت روزانه مطالب سایت از بهترین سایت های سی جی
- ورود نامحدود کاربران از هر دیوایسی
- دسترسی به آموزش نصب کامل پلاگین ها و نرم افزار ها
اگر در تهیه اشتراک ویژه مشکل دارید میتونید از این لینک راهنمایی تهیه اشتراک ویژه رو مطالعه کنید . لینک راهنما
For International user, You can also stay connected with online support. email : info@softsaaz.ir telegram : @SoftSaaz
امتیاز دهی به این مطلب :
امتیاز سافت ساز
لطفا به این مطلب امتیاز دهید ☺️


