آموزش ایجاد ربات جنگ ستارگان در Blender
Blender: How to Create the Tiny K-2SO Star Wars Robot

آموزش ایجاد ربات جنگ ستارگان
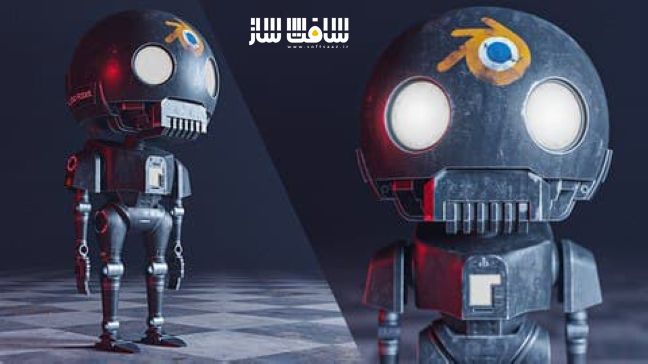
در این آموزش ایجاد ربات جنگ ستارگان از هنرمند Mrawan Hussain، همه چیزهای مورد نیاز را برای ایجاد یک ربات جنگ ستارگان K-2SO از صفر تا صد را در نرم افزار های بلندر و سابستنس پینتر یاد می گیرید. در این آموزش نحوه مدل و آنرپ کردن و افزودن متریال بسیار واقعی را به پروژه را می آموزید.
سپس به مرحله آنریپنگ که بسیار برای تکسچر ها مهم است خواهیم رسید. پس از اتمام مرحله Unwrapping، کار را به سابستنس پینتر میبریم و آن را برای تکسچرینگ آماده می کنیم. بعد نحوه ایجاد متریال PBR بسیار واقعی و ساخت جلوه کثیفی و قدیمی به ربات را می آموزیم.
پس از اتمام متریال، به بلندر برمیگردیم و آنچه که در سابستنس انجام دادیم ،ایمپورت کرده و مدل را برای رندر آماده می کنیم. در نهایت روبات را با انجین Cycles رندر خواهیم کرد جوری که نتیجه بسیار واقعی بنظر بیاید. این دوره آموزشی توسط تیم ســافــت ســاز برای شما عزیزان تهیه شده است.
عناوین اصلی دوره آموزشی :
- نحوه استفاده از بلندر و تنظیم صحنه
- نحوه مدل کردن هر آبجکت سطوح سخت
- نحوه آنرپ آبجکت و آماده سازی برای تکسچرینگ
- نحوه آماده سازی پروژه و ارسال به سابستنس پینتر
- نحوه ایجاد متریال PBR واقعی در Substance Painter
- نحوه ایجاد اسمارت متریال و استفاده از آن در پروژه
- نحوه رندر صحنه با انجین Cycle در Blender
عنوان دوره : Udemy – Blender: How to Create the Tiny K-2SO Star Wars Robot
سطح : متوسط
زمان کل دوره : 13 ساعت
تعداد فایل های تصویری : 58
سال آموزش : 2020
فایل تمرینی : دارد
مربی دوره : Mrawan Hussain
نرم افزار : Blender , substance painter
زیرنویس انگلیسی : ندارد
Udemy – Blender: How to Create the Tiny K-2SO Star Wars Robot
in this course, you will learn how to model and unwrap and add realistic material to your project, we will begin our journey with the most important part ( modeling ) we will start modeling the hole Robot from start to finish and we will use special tools comes default with Blender to accomplish that.
After the modeling section, we will jump to the most important stage, it’s Unwrapping, It’s a very important stage because if you don’t unwrap your model you can’t add the texture above it properly, so because of that I unwrapped all the Robot from start to finish so you can understand the tech neck that I’m using to achieve that quickly and perfectly.
after the Unwrapping section, we need to prepare the project to send it to Substance Painter, so in this stage, we will learn how to send the project correctly to Substance Painter without any problem to prepare it for texturing, and at Substance Painter, we will learn how to create realistic PBR material and how to make it old and dirty to give the project more realism.
After adding material to the Robot now we need to take the Robot back to Blender, so there we will learn how to import the texture from Substance Painter to Blender, and how to add them correctly on the Robot to prepare it for rendering.
then we will render the Robot with the Cycles render engine and make realistic results there, after that I will use the compositor to add some adjustment to the final render.
What you’ll learn
How to use blender and setup the scene
How to model any hard surface object
How to unwrap your object and prepare it for texturing
How to prepare the project to send it to substance painter.
How to create realistic PBR material in Substance Painter.
How to crate your smart material and use it in your project.
How to render the scene with Blender by using Cycles.
حجم کل : 10.6 گیگابایت

برای دسترسی به کل محتویات سایت عضو ویژه سایت شوید
برای نمایش این مطلب و دسترسی به هزاران مطالب آموزشی نسبت به تهیه اکانت ویژه از لینک زیر اقدام کنید .
دریافت اشتراک ویژه
مزیت های عضویت ویژه :
- دسترسی به همه مطالب سافت ساز
- آپدیت روزانه مطالب سایت از بهترین سایت های سی جی
- ورود نامحدود کاربران از هر دیوایسی
- دسترسی به آموزش نصب کامل پلاگین ها و نرم افزار ها
اگر در تهیه اشتراک ویژه مشکل دارید میتونید از این لینک راهنمایی تهیه اشتراک ویژه رو مطالعه کنید . لینک راهنما
For International user, You can also stay connected with online support. email : info@softsaaz.ir telegram : @SoftSaaz
امتیاز به این مطلب :
امتیاز سافت ساز
لطفا به این مطلب امتیاز بدید 🦋


