آموزش ایجاد صورت واقعی سه بعدی در Maya و ZBrush
Udemy - Create 3D Photorealistic Faces
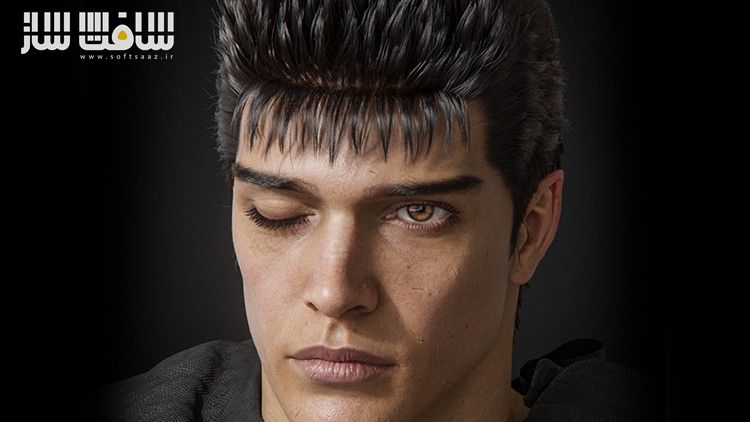
آموزش ایجاد صورت واقعی سه بعدی در Maya و ZBrush
آموزش ایجاد صورت واقعی سه بعدی در Maya و ZBrush : در این دوره از هنرمند Gerardo Torres Carrillo ، با نحوه ایجاد رندرهای فتورئالستیک از صورت های واقعی یک کاراکتر در مایا و زیبراش آشنا خواهید شد. ایشان در 2.5 ساعت ، نحوه خلق صورت کاراکتر ها با استفاده از Autodesk Maya 2024, Arnold Renderer, The Foundry Mari, The Foundry Nuke, Pixologic ZBrush and Photoshop نشان می دهد .این دوره آموزشی توسط تیم ســافــت ســاز برای شما عزیزان تهیه شده است.
عناوین آموزش ایجاد صورت واقعی سه بعدی در Maya و ZBrush :
- رازهای ایجاد صورت های فتورئالستیک
- نحوه تنظیم راحت با استفاده از specular, roughness و تکسچرهای sss
- پروجکتینگ تکسچرها با استفاده از Mari
- ایجاد مو با استفاده از XGen در مایا
- تکمیل و رندرینگ صورت واقعی و پست پراسسینگ
عنوان دوره : Udemy – Create 3D Photorealistic Faces
سطح : متوسط
زمان کل دوره : 2.52 ساعت
تعداد فایل ها : 10
سال آموزش : 2024
فایل تمرینی : دارد
مربی دوره : Gerardo Torres Carrillo
نرم افزار : Maya – ZBrush
زیرنویس انگلیسی : ندارد
Udemy – Create 3D Photorealistic Faces
Realistic Renders
Learn the secrets to create photorealistic faces.
Easily setup materials using specular, roughness and sss textures.
Projecting textures using Mari.
Creating hair using XGen inside of Maya.
Complete and render a realistic face including post processing.
See that face? I’ll show you how to make it. Based on Guts from Berserk.
Follow me in these series of videos, over 2.5 hours total, where i will show you how i create my characters.
Below are the softwares i usually use, but you can follow my steps in your favorite program, like Blender for example.
Software used: Autodesk Maya 2024, Arnold Renderer, The Foundry Mari, The Foundry Nuke, Pixologic ZBrush and Photoshop.
Note: Resources like the textures from TexturingXYZ are paid and separate. Also, this is not a beginner tutorial but you will learn a lot.
First we will start with a basic look at the modeling inside of ZBrush, setting up our model with another one to transfer the textures, then we go to Mari to start projecting the displacement and transfer textures. After that, we jump into Maya were most of the work is going to happen, setting up out model with our material, connecting all of out textures and get it ready to start rendering using Arnold Render. Once we have our render, we export it to start the post processing using Nuke and Photoshop to add those little extra steps to make it as realistic as we can outside of the 3D software.
Who this course is for:
This course is for anyone who want to get more realistic results with their characters.
This course is designed for people with intermediate level of knowledge with 3D softwares.
حجم کل : 2.2 گیگابایت

برای دسترسی به کل محتویات سایت عضو ویژه سایت شوید
برای نمایش این مطلب و دسترسی به هزاران مطالب آموزشی نسبت به تهیه اکانت ویژه از لینک زیر اقدام کنید .
دریافت اشتراک ویژه
مزیت های عضویت ویژه :
- دسترسی به همه مطالب سافت ساز
- آپدیت روزانه مطالب سایت از بهترین سایت های سی جی
- ورود نامحدود کاربران از هر دیوایسی
- دسترسی به آموزش نصب کامل پلاگین ها و نرم افزار ها
اگر در تهیه اشتراک ویژه مشکل دارید میتونید از این لینک راهنمایی تهیه اشتراک ویژه رو مطالعه کنید . لینک راهنما
For International user, You can also stay connected with online support. email : info@softsaaz.ir telegram : @SoftSaaz
امتیاز دهی به این مطلب :
امتیاز
لطفا به این مطلب امتیاز بدید 🦋


