شبیهسازی عضلات در Houdini با ورک فلوی استودیویی VFX
FlippedNormals – Ultimate Guide to Start Your Journey As An Envionment Artist
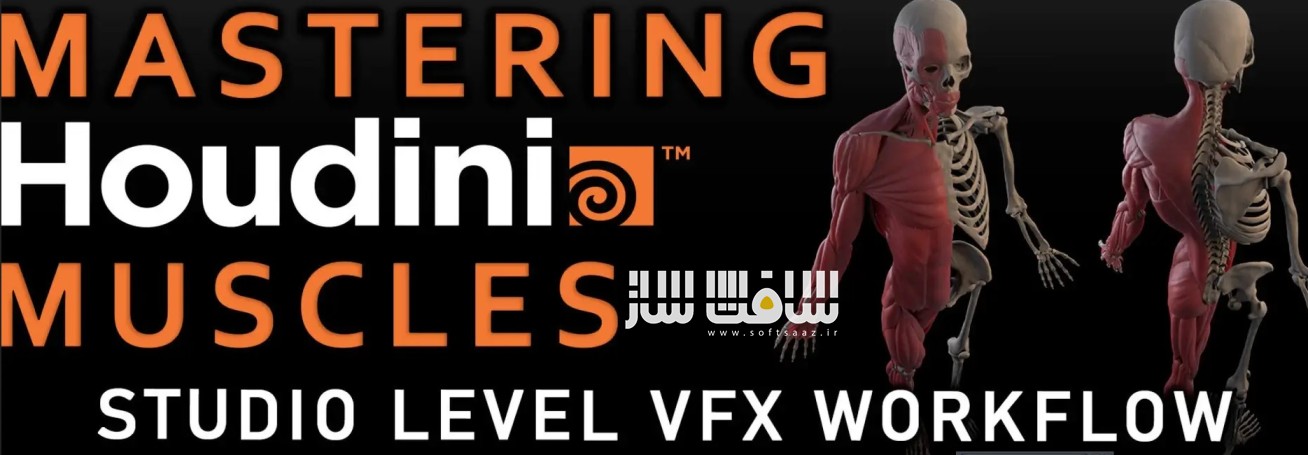
شبیهسازی عضلات در Houdini با ورک فلوی استودیویی VFX
شبیهسازی عضلات در Houdini با ورک فلوی استودیویی VFX : در این دوره از هنرمند Noah Schnapp ، با پایپلاین عضلانی انعطافپذیر و قابل استفاده مجدد و شبیه سازی عضلانی با استفاده از هودینی آشنا خواهید شد. در این دوره، با استفاده از مشهای ساده، سرعت شبیهسازی را افزایش میدهیم و یاد میگیریم که چگونه عضلات را بهطور کارآمد برای هر شخصیت بازپیکربندی کنیم و تداخلها را بهصورت خودکار حل کنیم.
پایپلاینی کارآمد و قابل استفاده مجدد ساخته میشود که میتواند در هر مرحله از پروژه وارد شود. همچنین به مباحثی مانند استفاده از عضلات ترکیبی، تولید حجمهای بافت و پوست بهصورت فرآیندی، تنظیم دقیق رفتار عضلات و تولید خودکار “Preroll” پرداخته میشود. در پایان، قادر خواهید بود شبیهسازی عضلات را از هر قسمت از انیمیشن بهراحتی انجام دهید و انیمیشنها را با یک کلیک شروع کنید.این دوره آموزشی توسط تیم ســافــت ســاز برای شما عزیزان تهیه شده است.
عناوین شبیهسازی عضلات در Houdini با ورک فلوی استودیویی VFX :
- ساخت یک پایپلاین عضلانی انعطافپذیر و قابل استفاده مجدد
- اتوماسیون فرآیندهای پیچیده برای سرعت بخشیدن به نسخههای سریعتر
- یادگیری چگونگی بازپیکربندی عضلات و داراییها بهطور کارآمد
- بهینهسازی سرعت شبیهسازی با استفاده از پردازش موازی و رندرفارم
- ایجاد تنظیمات کاملاً فرآیندی بدون نیاز به کدنویسی گسترده
- درک ابزارهای پیشرفته Houdini مانند شبکههای TOP و کشینگ خودکار
- اعمال پایپلاین به بازیها و پروژههای VFX در سطح استودیو

عنوان دوره : FlippedNormals – Ultimate Guide to Start Your Journey As An Envionment Artist
سطح : متوسط
زمان کل دوره : 33 ساعت
تعداد فایل ها : 120
سال آموزش : 2025
فایل تمرینی : دارد
مربی دوره : Noah Schnapp
نرم افزار : Houdini
زیرنویس انگلیسی : ندارد
فشردگی اختصاصی سافت ساز : ندارد
FlippedNormals – Ultimate Guide to Start Your Journey As An Envionment Artist
In this Training Series, You’ll learn the secrets behind Advanced Visual Effects Muscle Simulation. While other training series make the mistake of teaching a slow, high resolution asset, we’re going to make most of our time using simpler mesh for faster iteration.
We’ll learn how to reconform muscles efficiently to any character and how to procedurally solve intersections so a Human Artist doesnt have to manually touch things up. We’re going to cover simple and complex muscle examples, a variety of resources, and discuss real world physics, properties, and how certain values affect behavior.
We’ll set up an efficient, reusable pipeline including large networks with multiple file checkpoints so you can easily jump in at any point along the way. We’ll create a baseline character where we can adjust attributes that can be inherited to all of our future characters to get you up and running in a fraction of the time.
We’re going to look at the advantages and situations where we can leverage Franken-Muscles and Multi-Muscle setups and create a switch so we can easily blend between them. We’re going to discuss how we can use only our asset to procedurally generate the Tissue and Skin volumes and learn efficient ways to store data so we can easily change topology or point count order any time we like.
The next section is all about tuning muscle behavior. How To Flex, inflate, and jiggle exactly the way we want. Then we’re going to discuss how we can procedurally create masks to blend our simulation back onto only certain parts of our character.
One of the most valuable chapters in this training series discusses Automatic Preroll Generation. For years this has been a Manual Human process. We’re going to learn how we can procedurally generate and adjust this with simple sliders. Not only are we going to learn how to retarget animation from differently proportioned characters to any asset, but we’re going to learn how to start our simulation from any part of the animation using the Automatically Computed Best Rest Pose, Ramp up, and Pre-Animation Momentum. This means if you have a shot that’s 2000 frames long, you can now start at any point and choose where and how to blend in your simulation throughout the whole shot. We’ll also discuss Neutralizing and Restoring Locomotion to fix Super-Hero-like movement that moves too far and too fast over the course of our timeline. The best part is this network can be used for Cloth, Hair, or any of your Character Effects needs.
– Build a flexible, reusable muscle pipeline from scratch.
– Automate complex workflows for faster iterations.
– Learn to reconform muscles and assets efficiently.
– Optimize simulation speed using parallel processing and render farms.
– Create fully procedural setups without extensive coding.
– Understand advanced Houdini tools like TOP networks and automated caching.
– Apply the pipeline to games and VFX projects at a studio level.
حجم کل : 9 گیگابایت

برای دسترسی به کل محتویات سایت عضو ویژه سایت شوید
برای نمایش این مطلب و دسترسی به هزاران مطالب آموزشی نسبت به تهیه اکانت ویژه از لینک زیر اقدام کنید .
دریافت اشتراک ویژه
مزیت های عضویت ویژه :
- دسترسی به همه مطالب سافت ساز
- آپدیت روزانه مطالب سایت از بهترین سایت های سی جی
- ورود نامحدود کاربران از هر دیوایسی
- دسترسی به آموزش نصب کامل پلاگین ها و نرم افزار ها
اگر در تهیه اشتراک ویژه مشکل دارید میتونید از این لینک راهنمایی تهیه اشتراک ویژه رو مطالعه کنید . لینک راهنما
For International user, You can also stay connected with online support. email : info@softsaaz.ir telegram : @SoftSaaz
امتیاز دهی به این مطلب :
امتیاز سافت ساز
لطفا به این مطلب امتیاز بدید 🦋