دوره آموزشی فوق العاده رندرینگ Vray در Rhino
V-ray for Rhino 101 – Fundamentals of Rendering
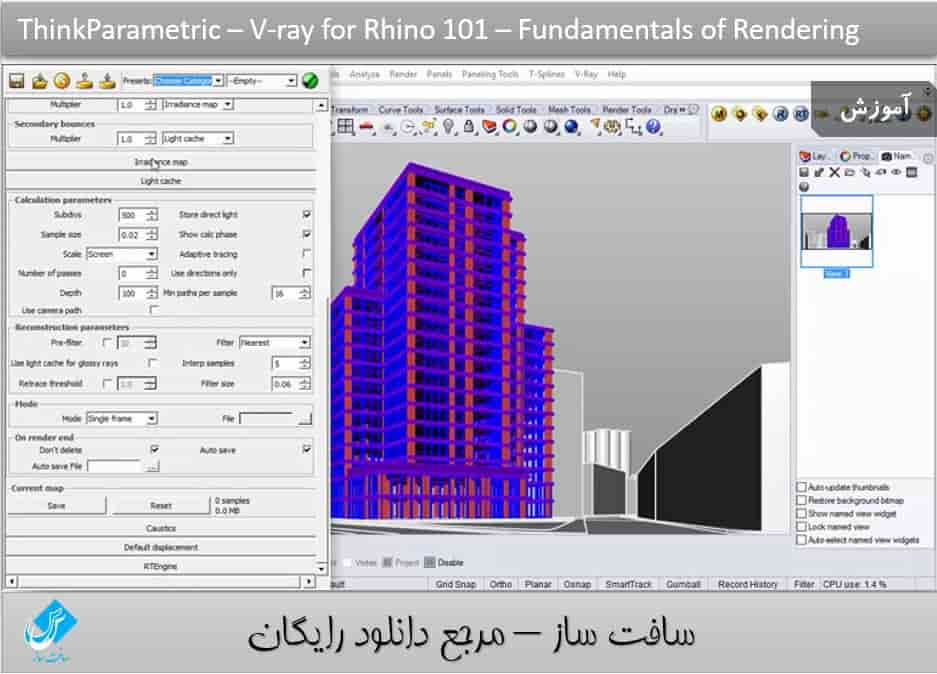
رندرینگ Vray در Rhino
در این دوره آموزشی از شرکت thinkparametric ، مربی دوره Jaime Sol ، به اصول تنظیم و رندینگ صحنه با ترکیب Rhino با پلاگین قدرتمند رندینگ VRay می پردازد ، با توضیحاتی از اینترفیس V-ray و نحوه استفاده از آن شروع می کند پس از به مهمترین تنظیمات وی ری برای رندرینگ خواهد پرداخت. وی ری به طور پیش فرض حاوی کتابخانه ایی از متریال هستش اما ایشان نحوه ایجاد متریال را از ابتدا توضیح می دهد.
تنظیمات محیط ، نحوه اضافه کردن سیستم نور خورشید ، تنظیم نور در زمان و مکان خاص ، رندینگ نهایی تصویر و کار با توابع پست پروداکشن ، از جمله مواردی است که در این دوره آموزشی که در سافت ساز ارائه شده است ، خواهید آموخت با سافت ساز همراه باشید.
عناوین اصلی این دوره آموزشی:
- مقدمه ایی برا اینترفیس V-ray
- تنظیم نما برای رندرینگ
- تنظیمات اصولی وی ری
- تنظیم کردن متریال
- نقشه برداری تکسچر ، نقشه Bump و Displacement
- تنظیمات محیط
- رندر نهایی
- تهیه فایلهای پست پروداکشن
- و …
لطفا قبل از دانلود پیش نمایش دوره را مشاهده فرمایید:
عنوان دوره : ThinkParametric – V-ray for Rhino 101 – Fundamentals of Rendering
سطح : مناسب برای همه
زمان کل دوره : 1 ساعت و 14 دقیقه
تعداد فایل های تصویری : 6
سال آموزش : 2016
فایل تمرینی : دارد
مربی دوره : Jaime Sol
نرم افزار : Rhino ,V-ray , Rhinoceros
زیرنویس : ندارد
ThinkParametric – V-ray for Rhino 101 – Fundamentals of Rendering
In this course, we will walk you trough the basics of setting-up and rendering your scene. We are going to use Rhinoceros 3D combined with a rendering plugin called V-ray. We choose V-ray, because it is one of the most powerful rendering software out there, especially for architectural renderings. It is also remarkably easy to use, so your learning curve will be as smooth as possible.
We are going to start by explaining the basic interface of V-Ray and the most important options we are going to use. After that, we will dive a little deeper into the most important settings we are going to use for our render.
V-ray has a default library with materials, but we´ll cover how can you create your own from scratch.
The last lessons will include setting up the environment, how to add a sunlight system and how to get the lightning precise for a particular time and location in the world. After we have rendered our final image, we will explain the different channels and their functions relevant for post-production.
Introduction to the V-ray interface and setting up our view for rendering 10min 25seg
Setting up our basic V-ray settings 06min 31seg
Setting up our materials 26min 05seg
Texture Mapping, Bump Mapping and Displacement Maps explained 13min 57seg
Setting up our environment 09min 48seg
Finalizing render and preparing files for post-production 07min 45seg
حجم کل :

برای دسترسی به کل محتویات سایت عضو ویژه سایت شوید
برای نمایش این مطلب و دسترسی به هزاران مطالب آموزشی نسبت به تهیه اکانت ویژه از لینک زیر اقدام کنید .
دریافت اشتراک ویژه
مزیت های عضویت ویژه :
- دسترسی به همه مطالب سافت ساز
- آپدیت روزانه مطالب سایت از بهترین سایت های سی جی
- ورود نامحدود کاربران از هر دیوایسی
- دسترسی به آموزش نصب کامل پلاگین ها و نرم افزار ها
اگر در تهیه اشتراک ویژه مشکل دارید میتونید از این لینک راهنمایی تهیه اشتراک ویژه رو مطالعه کنید . لینک راهنما
For International user, You can also stay connected with online support. email : info@softsaaz.ir telegram : @SoftSaaz
امتیاز
جمع امتیاز
لطفا به این آموزش امتیاز بدهید


