مسترکلاس کانسپت محیط در Blender از Blender Bros
Blender Bros - Concept Environment Masterclass in Blender
مسترکلاس کانسپت محیط در Blender از Blender Bros
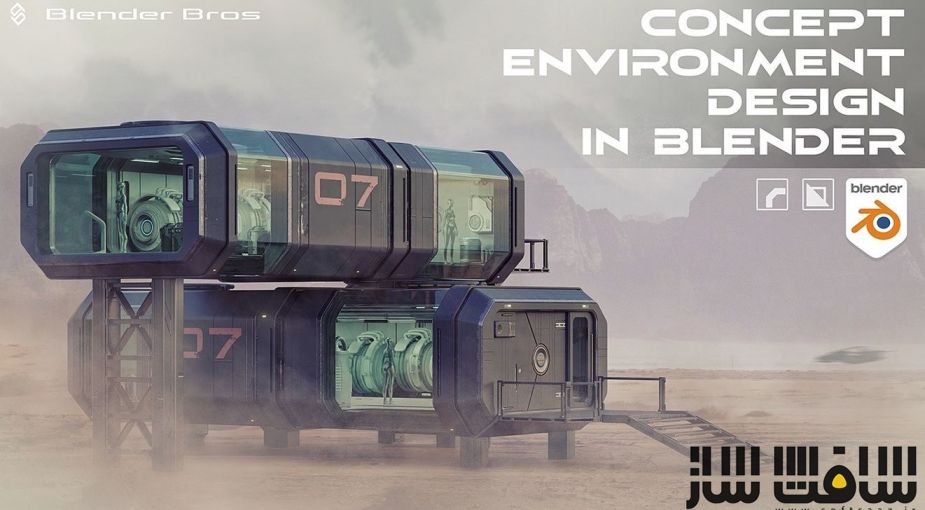
مسترکلاس کانسپت محیط در Blender از Blender Bros : در این دوره از Blender Bros ، هنرمندان Ponte Ryuurui و Josh Gambrell ، با نحوه ایجاد محیط های زیبا و آماده برای پورتفولیو خود در بلندر آشنا خواهید شد. این دوره فرآیند آسان و گام به گام ساخت محیط های SciFi شگفت انگیز را از صفر در بلندر نشان می دهد. این دوره در 7 سکشن ، مسدود سازی ، مدلینگ ، جزییات دهی ، تریم شیت ها ،رندرینگ ، کامپوزیشن و ایجاد آبجکت کیتبش را پوشش می دهد.این دوره آموزشی توسط تیم ســافــت ســاز برای شما عزیزان تهیه شده است.
عناوین مسترکلاس کانسپت محیط در Blender از Blender Bros :
- ارائه طراحی
- رندرینگ و نورپردازی
- 6ساعت محتوای ویدیویی
- آموزش کامپوزیشن فتوشاپ
- آموزش مدلینگ و تکسچرینگ
- آموزش تکسچرینگ تریم شیت Trim Sheet

عنوان دوره : Blender Bros – Concept Environment Masterclass in Blender
سطح : مبتدی تا پیشرفته
زمان کل دوره : – ساعت
تعداد فایل ها : 21
سال آموزش : 2024
فایل تمرینی : دارد
مربی دوره : Ponte Ryuurui – Josh Gambrell
نرم افزار :photoshop – Blender
زیرنویس انگلیسی : ندارد
Blender Bros – Concept Environment Masterclass in Blender
Create beautiful, portfolio-ready environments in Blender
Section 1
Blockout
Creating a blockout of your model is essential to get the foundations started.
You’ll have a general idea of the form, and will immediately be able to picture how to add additional detail to it rather than imagining it from scratch.
Section 2
Modeling
After the blockout, we can begin adding primary details to our structure.
This phase will allow you to progress from blockout to the mid-detail stages of the model.
Section 3
Details
Now that we have the general form created, we can add more intricate details on the model.
This is what gives the model a more complete feel, because smaller elements all add up into something big.
Section 4
Trim Sheets
Trim Sheets let you texture different areas of your model in 1 click.
They are literally texture maps, allowing you to create intricate detail without having to model a single thing.
Section 5
Rendering
Setting up your render can be tricky. You need the right camera angle, lighting setup, and backdrop.
This entire process is broken down into an easy to understand workflow, focusing only on what is needed.
Section 6
Compositing
After rendering, it is essential to touch up your image in order to add your own personal touch. Every artist should have their own unique style. This is one way to do it.
In terms of this course, we use Photoshop to paint in things like dust, smoke, planets, vehicles, shadows, and more to make the image believable and to tell a story.
Section 7
BONUS: Kitbash Object Creation
4 bonus tutorials on how to create the filler models used in the interior of the structure.
حجم کل : 5 گیگابایت

برای دسترسی به کل محتویات سایت عضو ویژه سایت شوید
برای نمایش این مطلب و دسترسی به هزاران مطالب آموزشی نسبت به تهیه اکانت ویژه از لینک زیر اقدام کنید .
دریافت اشتراک ویژه
مزیت های عضویت ویژه :
- دسترسی به همه مطالب سافت ساز بدون هیچ گونه محدودیتی
- آپدیت روزانه مطالب سایت از بهترین سایت های سی جی
- بدون تبلیغ ! بله با تهیه اکانت ویژه دیگه خبری از تبلیغ نیست
- دسترسی به آموزش نصب کامل پلاگین ها و نرم افزار ها
اگر در تهیه اشتراک ویژه مشکل دارید میتونید از این لینک راهنمایی تهیه اشتراک ویژه رو مطالعه کنید . لینک راهنما
For International user, You can also stay connected with online support. email : info@softsaaz.ir telegram : @SoftSaaz
امتیاز دهی به این مطلب :
امتیاز سافت ساز
لطفا به این مطلب امتیاز بدید 🦋