آموزش تکسچرینگ موجودات انسان نما
FXPHD - MAR203 - Bipedal Creature Texturing

آموزش تکسچرینگ موجودات انسان نما
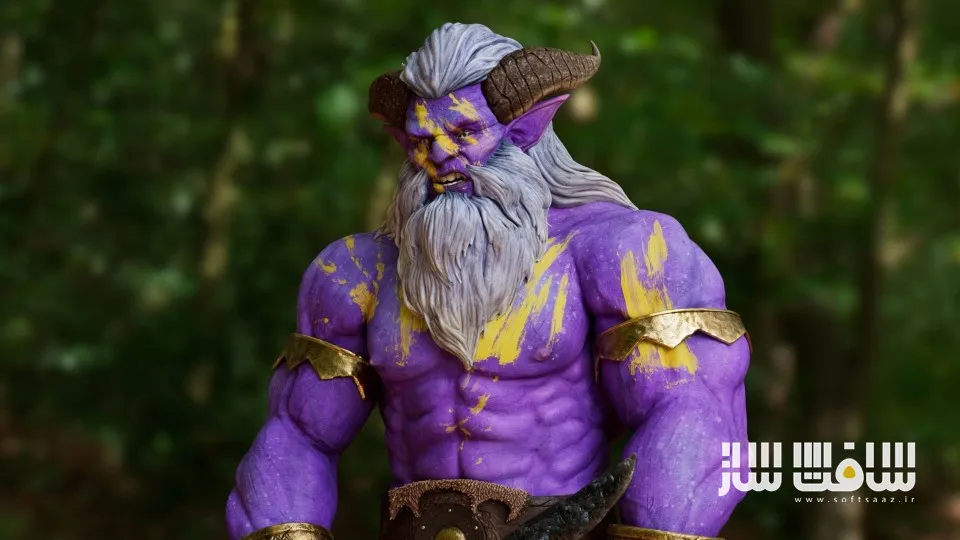
آموزش تکسچرینگ موجودات انسان نما : این دوره از Nastasia Bois، هنرمند ارشد تکسچر با بیش از 12 سال سابقه فعالیت در حوزه انیمیشن، تبلیغات و جلوههای ویژه سینمایی، به آموزش کامل فرآیند تکسچرینگ موجودات انساننما برای پروژههای حرفهای میپردازد. در این آموزش یاد میگیرید چگونه با استفاده از Mari و Substance Painter، تکسچرهایی واقعگرایانه و آماده تولید برای شخصیتهای موجودات طراحی کنید.
از تحلیل رفرنسها و برنامهریزی اولیه گرفته تا ساخت انواع نقشههای تکسچر، مدیریت متریالها، خروجیگیری استاندارد و آمادهسازی فایلها برای مراحل Lookdev، تمامی مراحل بهصورت عملی و مطابق با استانداردهای استودیوهای حرفهای پوشش داده میشود.
در طول دوره روی تکسچرینگ کامل یک موجود انساننما کار خواهید کرد و با ساخت متریالهای پوست، مو، شاخ، چنگال، چشم، دهان، چرم، خز، فلز و سنگ آشنا میشوید. همچنین نحوه ترکیب متریالهای ارگانیک و Hard Surface در یک دارایی واحد، استفاده از Node Graph در Mari، استراتژیهای Masking، مدیریت کانالهای خروجی و ارائه حرفهای پروژهها را فرا خواهید گرفت. این دوره آموزشی توسط تیم ســافــت ســاز برای شما عزیزان تهیه شده است.
عناوین آموزش تکسچرینگ موجودات انسان نما :
- آموزش تحلیل رفرنسها و طراحی استراتژی تکسچرینگ
- بررسی ساختار متریالها و آمادهسازی پروژه برای Lookdev
- استخراج Utility Mapها از Substance Painter
- ساخت نقشههای AO، Curvature و متریالهای پایه
- راهاندازی حرفهای پروژه در Mari
- آموزش کامل Node Graph و مدیریت ساختار پروژه
- ایجاد سیستم متریال و ماسکبندی برای داراییهای پیچیده
- وارد کردن Utility Mapها و تنظیم نورپردازی اولیه
- تکسچرینگ پوست موجودات انساننما
- ساخت Diffuse Map با جزئیات واقعگرایانه
- آموزش ایجاد Specular Map
- ساخت Roughness Map حرفهای
- ایجاد Normal Map با جزئیات بالا
- آموزش Subsurface Scattering (SSS) برای پوست
- تکسچرینگ مو، ریش و یال موجودات
- ایجاد متریالهای واقعگرایانه برای Hair و Fur
- تکسچرینگ شاخها و چنگالها
- ساخت جزئیات سطحی با استفاده از Normal و SSS
- طراحی و تکسچرینگ چشمها و دهان
- ایجاد متریالهای گوشتی و طبیعی برای اجزای صورت
- تکسچرینگ لباسها و تجهیزات شخصیت
- ساخت متریال چرم و خز
- ایجاد متریال فلز و سنگ
- استفاده از نقشههای خروجی Substance Painter و Designer
- ترکیب متریالهای Hard Surface و ارگانیک در یک دارایی واحد
- ساخت Area Maskها برای مراحل Lookdev
- خروجیگیری استاندارد برای Pipelineهای حرفهای
- آمادهسازی فایلها برای تحویل به تیم Lookdev
- آموزش ارائه و رندر نهایی پروژه
- آشنایی با استانداردهای استودیوهای VFX و انیمیشن
عنوان دوره : FXPHD – MAR203 – Bipedal Creature Texturing
سطح : متوسط
زمان کل دوره : 5.51 ساعت
تعداد فايل ها : 10
سال آموزش : 2026
فایل تمرینی : دارد
مربی دوره : Nastasia Bois
نرم افزار : Substance Painter – Mari
زیرنویس انگلیسی : ندارد
فشردگی اختصاصی سافت ساز : ندارد
FXPHD – MAR203 – Bipedal Creature Texturing
Creature assets sit at the intersection of organic and hard-surface texturing, requiring a thoughtful balance of artistry, technical control, and clean, scalable workflows. This course is designed for artists looking to strengthen their approach to production-ready creature texturing, from early reference analysis and planning through to structured exports and handoff. If you want to build confidence working on humanoid creatures in Mari, understand how materials work together in lookdev, and make texturing decisions that hold up in a studio pipeline, this course provides a practical, real-world foundation.
In this course, you’ll follow the complete texturing process for a humanoid creature, working primarily in Mari, with support from Substance Painter for utility maps and base materials. The course covers reference analysis, material breakdowns, and project setup, then moves into detailed workflows for skin, hair, horns, claws, eyes, and mouth. You will create diffuse, specular, roughness, normal, and subsurface scattering maps. You’ll also texture props such as leather, fur, metal, and rock, learning to integrate organic and hard-surface materials into a cohesive asset. Along the way, you’ll explore Mari’s node graph, masking strategies, efficient exports, and presentation techniques to ensure your textures are ready for real-world lookdev and handoff.
Nastasia Bois is a senior texture artist based in London with over 12 years of experience across animation, advertising, and high-end visual effects. Nastasia has worked on a wide range of assets from props and environments to detailed creature work for studios including TeamTO, Milk VFX, and ILM. Specialising in creature texturing, Nastasia brings a strong balance of artistic storytelling and technical workflow knowledge, sharing practical insights shaped by real production experience throughout this course.
Class Listing
Class 1: References and Utility Maps
We’re gonna talk about the importance of references in the texturing process. We’ll thoroughly analyse the concept and model, and think ahead about everything we need to start on the right foot. We’re going to break down the model into materials and identify all the maps we’ll need for lookdev (including masks). Finally, check all the utility maps that will be required in the process and go into Substance Painter to extract them (AO, curvature, some basic materials/scratches).
Class 2: Mari Project Setup
This class will be all about setup. Setting up a clear, clean scene in Mari is essential to start a new project, especially for a complex asset with many materials like this one. We will go through the base of the node graph to do so. We’ll build a tree using the materials and their masks we previously considered, all the output channels, import all our utility map and set up a very quick lighting rig.
Class 3: Skin – Diffuse
We will start texturing the skin and working only on the diffuse map for now. As our primary material for this creature, we are going to dive into techniques to add realism and detail while keeping our artistic vision.
Class 4: Skin – Other Maps
Now that our diffuse is done, we need to move on to the other maps. This class covers specular, roughness, how to extract a fascinating, detailed normal map, and how subsurface scattering works to create a good set of maps that make skin look as good as possible.
Class 5: Fur (Hair and Beard)
Now we’re going to take care of the hair/mane and beard. In our model, the hair is made of a solid model, so there’s some room for creativity. We’ll experiment a bit to find the right balance in our maps to make them look as realistic as possible. We’ll take care of all the maps needed.
Class 6: Horns, Claws
This time, we are going to focus on horns and claws materials. Following our references, we are going to bring some nice details using a whole array of maps, including normal and SSS.
Class 7: Eyes and Mouth
In this last class of the actual creature bits, we’ll have a look at the eyes and the mouth and how to make them interesting and/or fleshy. Then again, going through all the maps we need (including SSS) to get a realistic
render.
Class 8: Props – Leather and Fur
Now we are going to start texturing the outfit, focusing in this class on fur and leather materials. It might look like skin and hair, but we’re going to work those materials slightly differently to see another way to get some nice results on those fairly similar materials.
Class 9: Props – Metal and Rock
We will focus on metal and rock materials, using some of our previously exported maps from Substance Painter and Designer to achieve a quick, efficient result. We will then see how to integrate all those hard surface materials with our organic ones.
Class 10: Last Check, Export and Renders
In this last class, we’re going to create and export all of our area maps, then check one last time what we’ve done so far and discuss the lookdev stage ahead. What lookdev will need depends on each artist and studio, and it can be tricky when you don’t know who’s taking over the asset, hence the importance of masks! We’ll finally have a quick look at a pre-lookdev scene and how to present your texturing work.
حجم کل : 10 گیگابایت
برای نمایش این مطلب و دسترسی به هزاران مطلب آموزشی، نسبت به تهیهی اکانت ویژه از لینک زیر اقدام کنید.
وضعیت فعلی شما
- لینکهای دانلود این مطلب قفل است
- بقیهی مطالب ویژه هم بسته است
- بدون دسترسی به آموزش نصب
با اشتراک ویژه
- دسترسی به همهی مطالب سافتساز
- آپدیت روزانه مطالب سایت از بهترین سایتهای سیجی
- ورود نامحدود کاربران از هر دیوایسی
- دسترسی به آموزش نصب کامل پلاگینها و نرمافزارها
For international users: online support — email info@softsaz.ir or Telegram @SoftSaaz.