آموزش ریگ کردن حیوانات در مایا Maya
3DMotive – Quadruped Rigging in Maya
ریگ کردن حیوانات
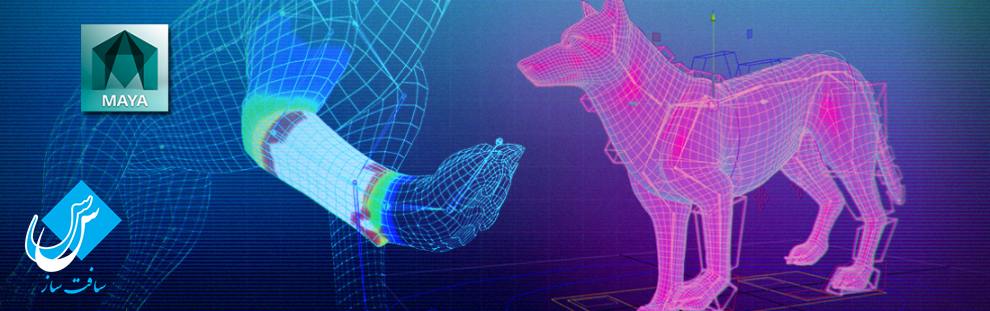
در این آموزش ” ریگ کردن حیوانات در مایا ” از شرکت 3DMotive مربی دوره Chad Morgan ، به ریگ حیوانات و چهارپایان در نرم افزار Maya می پردازد.
چهارپایان انواع مختلف دارند، و همه آنها حرکات منحصر به فرد خود را دارند,در این آموزش استخوان بندی بدن یک سگ رو که حرکات بسیار شبیهی رو با همه چهار پایان دارد انجام می دهیم,و با راه حل های برطرف کردن مشکل شبیه سازی پاهای عقب اشنا می شوید,این دوره شامل 4 شماره می باشد.با سافت ساز همراه باشید .
عناوین اصلی دوره ریگ کردن حیوانات :
- بررسی پارامتر های کنترل
- آشنایی با مبانی اولیه
- نقشه بندی اسکلت
- چیدمان مشترک
- اتصال به مش
- پوست پاها ی عقب
- پوست پشت و دم
- پوست پاهای جلویی
- پوست گردن و سر
- آماده شدن برای ریگ دم
- ریگ دم
- ریگ پای عقب
- ریگ پای جلو
- انجام تنظیمات پرش
- راه اندازی محور پا
- ساختمان ریگ پای عقب
- ساختمان ریگ پای جلو
- ایجاد کنترل اصلی
- سر و گردن
- رفع اشکال ریگ

پیشنمایش های دوره ریگ کردن حیوانات :
عنوان دوره : 3DMotive – Quadruped Rigging in Maya Volume 1-4
سطح : متوسط
زمان کل دوره : 6.30 ساعت
تعداد فایل های تصویری : 34
سال آموزش : 2016
فایل تمرینی : دارد
مربی دوره : Chad Morgan
نرم افزار : Maya
زیرنویس : ندارد
3DMotive – Quadruped Rigging in Maya Volume 1-4
Quadrupeds come in various types, and they all have their own unique needs, but in this module we will rig a canine character which covers many of the unique problems in rigging a quadruped. Some of these problems include how to deal with the back leg and setting up a spline ik for the back.In the first module we will analyze the problem we are attempting to solve. We will start with talking about some basic rigging processes we will use throughout the modules, and then discuss how we will lay out our joints. At the end, we will bind our mesh to the joints and begin skinning.In the second module we will go through the process of skinning our character using tools such as the Paint Weights Tool, the Prune Small Weights function, and the Component Editor. In the third module, we start building the control rig to drive our bind joints, focusing on a simple fk control structure for the tail, and then working on the back dog legIn our fourth and final module, we will finish the rig, completing the front leg as well as the spine and the head/neck area. We will also illustrate how we can deal with some of the quirks we stumble over in Maya.
Quadruped Rigging in Maya Volume 1:
Chapter 1 – Intro 01:22
Chapter 2 – Zeroing Controls 16:41
Chapter 3 – Joint Basics 07:50
Chapter 4 – Planning Our Skeleton 11:39
Chapter 5 – Joint Layout 19:43
Chapter 6 – Binding the Mesh 13:24
Quadruped Rigging in Maya Volume 2:
Chapter 1 – Intro 00:24
Chapter 2 – Skinning the Back Legs 09:49
Chapter 3 – Skinning the Back Legs 02 10:05
Chapter 4 – Skinning the Back and Tail 16:12
Chapter 5 – Skinning the Front Legs 14:06
Chapter 6 – Skinning the Neck and Head 14:35
Quadruped Rigging in Maya Volume 3:
Chapter 1 – Intro00:54
Chapter 2 – Preparing to Rig the Tail 10:55
Chapter 3 – Rigging the Tail 11:10
Chapter 4 – Creating the Back Leg FK Rig 15:36
Chapter 5 – Creating the Back Leg IK Rig 09:20
Chapter 6 – Setting Up Plane Driver 14:19
Chapter 7 – Finishing the Back Leg IK Handles 15:22
Chapter 8 – Setting Up Foot Pivots 10:17
Chapter 9 – Setting Driven Keys 19:47
Chapter 10 – Finishing the Rear Leg 14:30
Quadruped Rigging in Maya Volume 4:
Chapter 1 – Intro 00:57
Chapter 2 – Building the Front Leg FK Rig 06:20
Chapter 3 – Building the Front Leg IK Rig 19:22
Chapter 4 – Dealing with Maya Quirks 07:09
Chapter 5 – Resetting the Driven Keys 17:33
Chapter 6 – Creating the Main Controls 08:29
Chapter 7 – Rigging the IK Back 16:10
Chapter 8 – Rigging the FK Back 14:12
Chapter 9 – Stretchy Spline IK 09:40
Chapter 10 – Head and Neck 11:11
Chapter 11 – Repairing the Rig 09:33
Chapter 12 – Finishing the Head and Neck Rig 15:49
دانلود با لینک مستقیم و سرعت بالا :

برای دسترسی به کل محتویات سایت عضو ویژه سایت شوید
برای نمایش این مطلب و دسترسی به هزاران مطالب آموزشی نسبت به تهیه اکانت ویژه از لینک زیر اقدام کنید .
دریافت اشتراک ویژه
مزیت های عضویت ویژه :
- دسترسی به همه مطالب سافت ساز
- آپدیت روزانه مطالب سایت از بهترین سایت های سی جی
- ورود نامحدود کاربران از هر دیوایسی
- دسترسی به آموزش نصب کامل پلاگین ها و نرم افزار ها
اگر در تهیه اشتراک ویژه مشکل دارید میتونید از این لینک راهنمایی تهیه اشتراک ویژه رو مطالعه کنید . لینک راهنما
For International user, You can also stay connected with online support. email : info@softsaaz.ir telegram : @SoftSaaz
امتیاز دهی به این مطلب :
امتیاز سافت ساز
لطفا به این مطلب امتیاز دهید ☺️