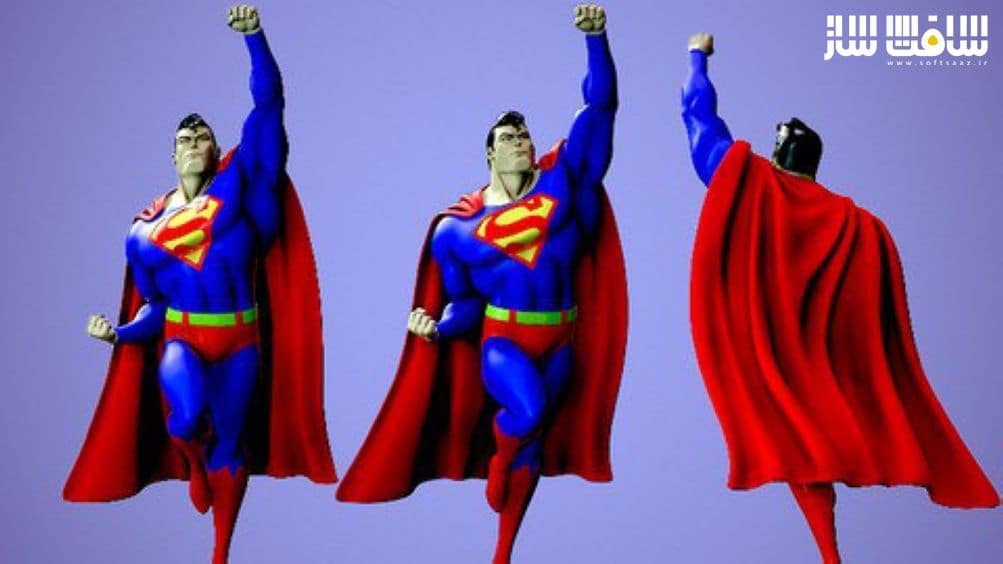
ایجاد کاراکتر سوپرمن با سبک خاص در Zbrush و Marmoset Toolbag 4
Udemy - Stylized Superman Zbrush and Marmoset Toolbag 4
ایجاد کاراکتر سوپرمن با سبک خاص
ایجاد کاراکتر سوپرمن با سبک خاص در Zbrush و Marmoset Toolbag 4 : در این دوره از هنرمند Oleg Khonko، با نحوه ساخت یک کاراکتر Superman با سبک خاص در Zbrush و Marmoset Toolbag 4 آشنا خواهید شد. این دوره تمامی لوازم جانبی کاراکتر سوپرمن، به همراه لباس و جزییات آن را خواهد ساخت.این دوره آموزشی توسط تیم ســافــت ســاز برای شما عزیزان تهیه شده است.
عناوین آموزش :
- آناتومی مردانه با سبک خاص
- تجهیزات جانبی
- موها با سبک خاص
- پولی پینتینگ
- ژست دهی
- شبیه سازی لباس و چین و چروک ها
- رندرینگ در Zbrush و Marmoset Toolbag 4

عنوان دوره : Udemy – Stylized Superman Zbrush and Marmoset Toolbag 4
سطح : متوسط
زمان کل دوره : 14 ساعت
تعداد فایل های تصویری : 32
سال آموزش : 2022
فایل تمرینی : دارد
مربی دوره : Oleg Khonko
نرم افزار : Zbrush – Marmoset Toolbag 4
زیرنویس انگلیسی : دارد
Udemy – Stylized Superman Zbrush and Marmoset Toolbag 4
Hi, my name is Oleg and I want to share this course with you. We will make stylized Superman model, also all props and accessories.
We will start by talking about base mesh, than we will start to block shapes and proportions by bringing our references to spotlight witch is really important. After initial blockout is done we will poly paint our model to have a better visualization.
Then we will start to make organic parts of a model. We will start from a fists and i explain how to make them look as good as possible. After that, I will show you how to make superman iconic face, where I will explain what to look for when sculpting the head.
Then we will make a placeholder for a hair by using a sphere, after that i will add eyes and than i will poly paint them, since eyes are very important, I will explain how to avoid odd or a strange look.
Then i will make low poly version of his costume and will reproject existing details. Also i will create boots by extracting from existing geometry and by using zremesher i will make a low poly model, after that i will finalize them by adding a thickness and subdivisions. Then it will be time to zremesh a hair and to refine it by make a final touches.
After that i will start to make a cape by using a simple plain and zmodeler brush. Also i will reproject superman logo to a body using zProject brush just to have a better visual representation.
Once we are happy with the overall look of our character i will show you how to make good pose with the transpose master in zbrush. I will show how to achieve great dynamic pose just in zbrush utilizing zbrush powerful masking tool. After that i will refine shapes and forms of a model so his muscles and overall dynamic pose will look great. After pose is done i will continue to create accessories such as pants, belt and belt buckle also i will poly paint them.
Ofcourse i will continue to work on a cape by adding a folds and give it a dynamic look.
Finally i will show how to make his iconic logo using only alpha, and than i will show how to make a low poly version of his logo so we can easily place it on body using zproject brush.
After that we will start refining all those things that we have made, i will add wrinkles to his costume where it make a sens, also to finilize his costume i will add a seam lines and i will do a final touches to a cape. At this point we almost done, but there still some thing left. One of them is base, i will make it from cylinder using zmodeler brush. Also i will show how to create UV’s utilizing powerful “UW Master”, after that i will generate texture from poly paint. Finally i will show how to decimate our model using “Decimation Master” and to keep UV’s.
So now we done with zbrush and our model is look great, and we can start to work with Marmoset Toolbag to achieve the best possible look.
So we start by explaining how to bring your model to Marmoset, after that i will explain how to create materials and additional maps such as ambient occlusion and cavity maps. Than i explain how to assign materials to according models. Also i will explain my render and camera configurations, i will show how to add a turntable and how to achieve the best possible look for our model.
This tutorial is STEP BY STEP, NO FAST FORWARD, NO SKIPS.
حجم کل : 12.5 گیگابایت

برای دسترسی به کل محتویات سایت عضو ویژه سایت شوید
برای نمایش این مطلب و دسترسی به هزاران مطالب آموزشی نسبت به تهیه اکانت ویژه از لینک زیر اقدام کنید .
دریافت اشتراک ویژه
مزیت های عضویت ویژه :
- دسترسی به همه مطالب سافت ساز بدون هیچ گونه محدودیتی
- آپدیت روزانه مطالب سایت از بهترین سایت های سی جی
- بدون تبلیغ ! بله با تهیه اکانت ویژه دیگه خبری از تبلیغ نیست
- دسترسی به آموزش نصب کامل پلاگین ها و نرم افزار ها
اگر در تهیه اشتراک ویژه مشکل دارید میتونید از این لینک راهنمایی تهیه اشتراک ویژه رو مطالعه کنید . لینک راهنما
For International user, You can also stay connected with online support. email : info@softsaaz.ir telegram : @SoftSaaz
امتیاز به این مطلب :
امتیاز سافت ساز
لطفا به این مطلب امتیاز بدید