آموزش تکسچرینگ در Mari و Substance Designer برای پروداکشن
Texturing Tutorial in Mari and Substance Designer – For Production By Zak Boxall
آموزش تکسچرینگ در Mari و Substance Designer
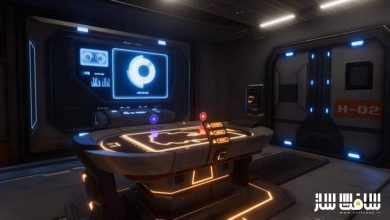
در این آموزش تکسچرینگ در Mari و Substance Designer ، هنرمند تکسچر و Look Development آقای Zak Boxall، فرآیند بازسازی یک کپسول فضایی را با توجه بر عکس رفرنس نشان خواهد داد. از هیچ پلاگینی استفاده نمیکنیم و فقط از برنامه های Mari, Substance Painter, Designer و Photoshop بهره خواهیم گرفت.
نحوه کار بصورت کارآمد و سازمان یافته تر را با استفاده از node graph نشان می دهیم. در 4 ساعت و نیم ، درجه بندی عکس ها ، حذف سایه ها و هایلایت ها ، ساخت تایلیبل و مپ رنگی را انجام می دهیم. به پینت مپ هایی از قبیل specular roughness,، مپ displacement و ماسک های ایزولیشن برای کنترل بیشتر در look development خواهیم پرداخت.
در ادامه نحوه ساخت ماسک های کثیف و پوششی رویه ایی چند لایه را از ابتدا در داخل ماری مشابه با اسمارت ماسک ها در Substance Painter را یاد می گیریم. تاکید بر استفاده از تکنیک های رویه ایی است. این دوره آموزشی توسط تیم ســافــت ســاز برای شما عزیزان تهیه شده است.
عناوین اصلی دوره آموزشی :
- جمع آوری رفرنس
- حذف سایه و هایلاتیت ها و ساخت کاشی کاری
- مقدمه ایی بر اینترفیس ماری و اصول نود گراف
- ایمپورت تایلیبل روی مدل
- طرح ریزی مرجع
- بیک مپ های مورد نیاز در سابستنس
- تولید ماسک در Substance Designer
- تولید مپ Displacement در Substance Designer
- تولید مپ رنگی در Substance Designer
- ادغام کاشی سابستنس دیزاینر در یک مدل
- پینت ماسک برای lookdev
- تطبیق رفرنس نزدیکتر و افزودن جزییات به colour map
- نقاشی ماسک کثیف
- تنظیم کانال برای اکسپورت
- اکسپورت تکسچره

عنوان دوره : Gumroad – Texturing Tutorial in Mari and Substance Designer – For Production By Zak Boxall
سطح : متوسط
زمان کل دوره : 4.30 ساعت
تعداد فایل های تصویری : 20
سال آموزش : 2020
فایل تمرینی : دارد
مربی دوره : Zak Boxall
نرم افزار : Photoshop – Mari – Substance Designer & Painter
زیرنویس انگلیسی : ندارد
Gumroad – Texturing Tutorial in Mari and Substance Designer – For Production By Zak Boxall
My name is Zak Boxall and I’m a texture and Look Development Artist in the Visual Effects industry. I’ll be showing you the steps I took to recreate this space capsule 1-1 based on photographic reference. We’ll dip into Mari, Substance Painter, Designer and Photoshop. But the goal here is to understand each step and not just follow along, we’ll go through the why’s and how’s, so by the end of this series, you’ll be able to apply these theories to your own models. It’s also worth noting, we won’t be using any third party plugins at any point.
For those of you that are already familiar with Mari and are used to working with layers, we’re going to be texturing exclusively in the node graph. I’ll show you how the node graph can allow you to work more efficiently and organised, in a procedural yet non destructive manner to get full coverage as a base. But we’ll hand paint details on each mask, to fully realize and match our reference.
With nearly 4 and a half hours of content we’ll go from beginning to end, grading the on-set photos, removing shadows & highlights, making tilables and building the colour map. We’ll then break the texturing into the various layers required for current physically based renderers. We’ll paint all channels in isolation, and work in different details into each map, to ultimately help define a surface that’s visually interesting, but matches our reference.
We’ll paint maps such as specular roughness, different levels of displacement and isolation masks for further control in look development.
We’ll also go through how to create multi layered procedural edge wear and dirt masks from scratch inside of Mari – Similar to smart masks you can get in Substance Painter.
The emphasis is on using these procedural techniques as a base, where we will then hand paint on top to art direct and paint hero moments, to help tell a story with your asset.
And finally all along the way, I’ll show you how I work non-destructively in anticipation for feedback expected in a production environment.
** Video Tutorial Files + OBJ + Source Images ** You’ll receive the above plus the model, texture shoot and tilable textures I use in the series to fully follow along with every step.
** Video Tutorial Files, OBJ, Source Images + Project Files ** You’ll receive all of the above plus all my project files. I added this option as I learn the most when dissecting other people’s project scenes and Mari archives.
** Software used **
– I’m going to be using Mari 4.2v1, but the techniques we’ll be going through will be compatible with any Mari version greater than 3.
– Photoshop, Substance Painter and Substance Designer.
** What skill level do I need to be? **
– Mari – I’m not going to go over every single button and function that you can do in Mari, however every technique that we use, I will explain.
– Substance Painter – We touch Substance Painter to bake utility maps only, it’s a simple process so no previous experience is required.
– Substance Designer – We use Designer for the ‘bottom’ grey coloured base of the space capsule. I don’t go over every single node, and we won’t be creating the ‘bottom’ base from scratch, however we’ll run through my node graph comprehensively to discuss creation of masks and how we can layer them together to build our colour, displacement and dirt mask. I will provide my scene file for you to go over in your leisure.
– Photoshop, we will be using photoshop to grade our reference. I’ll go over every step of the way.
** All lessons **
Part 1 – Grading of reference
Part 2- Removing shadows & Highlights and making tilables
Part 3 – Intro to Mari’s interface and node graph basics
Part 4 – Importing tilables onto model
Part 5 – Reference projection
Part 6 – Matching reference closer
Part 7 – Baking utility maps in Substance and making edge wear
Part 8 – Mask generation in Substance Designer
Part 9 – Displacement generation in Substance Designer
Part 10 – Colour map generation in Substance Designer
Part 11 – Integrating Substance Designer tile into model
Part 12 – Node graph housekeeping and mask painting for lookdev
Part 13 – Matching reference closer and adding details to colour map
Part 14 – Painting Dirt mask
Part 15 – Painting engine soot mask
Part 16 – Painting broad displacement
Part 17 – Painting specular roughness
Part 18 – Painting fine displacement
Part 19 – Setting up channels for export
Part 20 – Exporting textures
حجم کل : 15.7 گیگابایت

برای دسترسی به کل محتویات سایت عضو ویژه سایت شوید
برای نمایش این مطلب و دسترسی به هزاران مطالب آموزشی نسبت به تهیه اکانت ویژه از لینک زیر اقدام کنید .
دریافت اشتراک ویژه
مزیت های عضویت ویژه :
- دسترسی به همه مطالب سافت ساز بدون هیچ گونه محدودیتی
- آپدیت روزانه مطالب سایت از بهترین سایت های سی جی
- بدون تبلیغ ! بله با تهیه اکانت ویژه دیگه خبری از تبلیغ نیست
- دسترسی به آموزش نصب کامل پلاگین ها و نرم افزار ها
اگر در تهیه اشتراک ویژه مشکل دارید میتونید از این لینک راهنمایی تهیه اشتراک ویژه رو مطالعه کنید . لینک راهنما
For International user, You can also stay connected with online support. email : info@softsaaz.ir telegram : @SoftSaaz
امتیاز به این مطلب :
امتیاز سافت ساز
لطفا به این مطلب امتیاز دهید :)